SysOrb Network Monitoring System Administrator's Guide
For version 3.4.1

Copyright © 1999 - 2008 Evalesco A/S
- Table of Contents
- Abstract
- 1. System Overview
-
- 1.1. SysOrb Components
- 1.2. How It Works
- 2. System Requirements
-
- 2.1. Agent Requirements
- 2.2. Server Requirements
- 3. Installing SysOrb
-
- 3.1. Installing the SysOrb Server
-
- 3.1.1. Microsoft Windows NT / 2000 / XP / Server 2003
- 3.1.2. Red Hat Linux 6.2 and newer versions (including RHEL releases)
- 3.1.3. Debian Linux 2.2 and 3.0
- 3.1.4. Mandrake Linux 9.0 and newer
- 3.1.5. SuSE Linux 7.3 and newer
- 3.1.6. FreeBSD 4.5
- 3.1.7. Solaris 8, 9 and 10
- 3.2. Installing a license file
- 3.3. Upgrading the SysOrb Server
- 3.4. Installing the SysOrb Agent
-
- 3.4.1. Microsoft Windows NT / 2000 / XP / Server 2003
- 3.4.2. Microsoft Windows Server 2003 on Itanium
- 3.4.3. Red Hat Linux 5.2, 6.2, 7.2 and newer
- 3.4.4. Debian GNU/Linux 2.2 and 3.0
- 3.4.5. Mandrake Linux 9.0 and newer
- 3.4.6. SuSE Linux 7.3, 8.2 and newer
- 3.4.7. FreeBSD 3.5 and 4.5
- 3.4.8. Sun Solaris 8, 9 and 10
- 3.4.9. Sun Solaris 2.6
- 3.4.10. HP HP-UX 11
- 3.4.11. IBM AIX 4.3
- 3.4.12. Compaq Tru64 4.0f
- 3.4.13. Novell NetWare 5.1
- 3.5. Upgrading LogChecks from SysOrb 2.4.0
- 3.6. Unattended installation on Windows
- 4. ServerCluster
- 5. Auto-upgrading the SysOrb Agent
- 6. SysOrb Server Configuration
-
- 6.1. Microsoft Windows NT / 2000
- 6.2. Unix-like systems (FreeBSD, Linux and Solaris)
- 6.3. Configuration Options Reference
-
- 6.3.1. Logging Options
- 6.3.2. Database Options
- 6.3.3. Network Connection Manager Options
- 6.3.4. NetCheck Manager Options
- 6.3.5. General SysOrb Server Options
- 6.3.6. Alert Dispatcher Options
- 6.3.7. SNMP Options
- 6.3.8. ServerCluster Options
- 6.3.9. Grid Options
- 6.4. Troubleshooting HTTPS/IMAPS/POP3S problems
- 7. SysOrb Web Interface Configuration
- 8. SysOrb Web Server Configuration
-
- 8.1. Web Server Configuration Reference
-
- 8.1.1. File Options
- 8.1.2. Logging
- 8.1.3. Server/network options
- 9. SysOrb Agent Configuration
- 10. Grid configuration
-
- 10.1. Grid overview
-
- 10.1.1. Grid IDs - the GID
- 10.1.2. Links
- 10.1.3. Endpoint security
- 10.2. Configuring the Master
- 10.3. Configuring the Satellite
- 10.4. Getting started with remote monitoring
- 11. SysOrb Server maintenance
-
- 11.1. Adding MIB files
- 11.2. Custom NetChecks
-
- 11.2.1. Configuring Custom NetChecks
- 11.3. Custom AlertPaths
-
- 11.3.1. Script environment
- 11.4. Creating a new database
- 12. SysOrb Import and Export tools
-
- 12.1. sysorb-exporter
- 12.2. sysorb-importer
- 12.3. Examples of how to use
- 13. SysOrb Tool
-
- 13.1. The select command
-
- 13.1.1. How to specify the timeformat
- 13.2. The insert command
- 13.3. The listdomains command
- 13.4. The listnodes command
- 13.5. The listchecks command
- 13.6. The listproperties command
- 13.7. The update command
- 13.8. Understanding the CSV file-format
-
- 13.8.1. Continuous checks
- 13.8.2. State checks
- 13.8.3. String checks
- 13.9. Example scripts
- 14. Acknowledgments
-
- 14.1. GD Graphics Library
- 14.2. OpenSSL Library
-
- 14.2.1. OpenSSL License
- 14.2.2. Original SSLeay license
- List of Examples
- 9-1. Good/bad check
- 9-2. Numeric integer check
- 9-3. Numeric real check
- 9-4. Differential numeric integer check
- 9-5. Differential numeric real check
- 9-6. Script outputting Response time: 1234 ms
- 9-7. Count the number of files in /tmp
- 9-8. IIS restart AgentAction
- 9-9. LogCheck declaration file
- 11-1. Custom NetCheck
- 12-1. Exporting contents of the Test domain
- 12-2. Contents of the exported file
- 12-3. Modified XML file, ready for import
- 12-4. Creating a node using sysorb-importer
- 13-1. Example extracting all data using bash
- 13-2. Example extracting all data on Windows
Abstract
This document describes the installation and initial configuration of the SysOrb Network Monitoring System. Please refer to the User's guide for the SysOrb Network Monitoring System for information about using the system after it is installed correctly. In particular the use of the Web interface is described in detail there.
This document is intended for use by the personnel responsible for installing, configuring and maintaining the SysOrb Network Monitoring System Server and Agents on a daily basis. It does not cover actual configuration of monitoring parameters etc.
Chapter 1. System Overview
The purpose of the SysOrb Monitoring System is to monitor servers in a network by talking to the servers and retrieving information about running services, current load and other metrics. This information can be used by the administrators of the network to track down problems with monitored servers, to solve problems before they arise, or as documentation or a forensics tool once problems has occurred.
1.1. SysOrb Components
The SysOrb Network Monitoring System consists of several major software components, the responsibilities of which are outlined below:
-
The SysOrb Server: This is the center of the SysOrb System. The Server can remotely check networked services (such as web servers and mail servers) via NetChecks, but it is also the central component to which the Agents will report device information and statistics. The SysOrb Server is the central repository in which all statistical and operational data are stored, and it is the entity in the SysOrb System that will actively alert administrators when problems arise in any of the monitored systems.
In the following text a node is any machine or device that can be monitored by SysOrb. A host is a node where the SysOrb Agent can be installed.
-
The SysOrb Agent: In order to actively monitor local devices (such as harddrives, memory, processor statistics etc.) on networked systems, those systems must run the SysOrb Agent. This program will gather operational information from the system on which it is running, and report these data to the SysOrb Server for further processing. In case of failures (such as a harddisk running full, or a crashed service process), the SysOrb Server can actively alert the administrators of the particular machine that reported the failure.
-
The Web Interface: In order to allow easy access to the monitoring data and then configuration of the SysOrb System from anywhere and from any platform, the Web-based Interface is provided. This User Interface ships as a part of the SysOrb Server, and is usually (but not necessarily) run on the same physical machine as the one running the SysOrb Server. In order to fully use and configure monitored services or devices in the SysOrb System, all you need is a computer with a web-browser capable of accessing the SysOrb Server computer.
-
ServerCluster: A powerful feature for high availability environments: Two (or more) SysOrb Servers can be configured in a ServerCluster, to provide on-line mirroring of data sets, transparent fail-over in case one of the servers should fail, and automatic load balancing during normal processing.
Note: While it is perfectly possible to have the ServerCluster running different operating systems in the same cluster, the accuracy of network delay measurements may decrease due to different capabilities of the OS'es.
1.2. How It Works
To illustrate how the SysOrb components work together, Figure 1 shows a setup of a SysOrb Server, some SysOrb Agents and a SysOrb Web Interface.
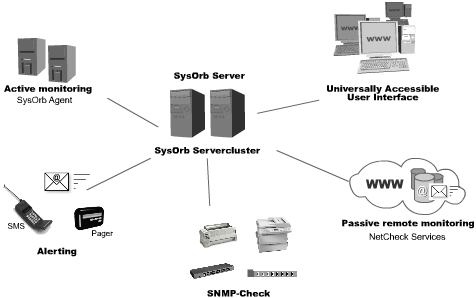
Figure 1: SysOrb Overview
The setup consists of a SysOrb ServerCluster, a SysOrb Agent and a SysOrb Web Interface. When a SysOrb Agent checks in on the SysOrb ServerCluster information about the SysOrb Agent's current status is stored in the SysOrb Server's database.
The SysOrb Web Interface connects to the SysOrb Server and through this interface the SysOrb user can monitor the network, add new SysOrb Agents and similar operations.
Chapter 2. System Requirements
The two sections below describe the minimum requirements for the SysOrb Agent and the SysOrb Server. We recommend that you check your system to ensure that these requirements are met before you install the SysOrb Agent or the SysOrb Server.
2.1. Agent Requirements
The SysOrb Agent software will run on most hardware used in servers today, and it currently supports nine major server operating systems. Because of this the SysOrb Agent software can be run on your servers without interfering with the servers' normal operations.
The actual requirements for running the SysOrb Agent software (which is required for monitoring local devices such as hard-drives etc. on the systems you wish to monitor) are as follows:
Please note: All requirements listed here, are the requirements of the agent alone - the requirements do not include requirements for the operating system and other base services.
Below the notion of "all versions" refers to all versions of the given operating system as supported by the SysOrb Agent.
-
Microsoft Windows NT 4.0, Windows 2000/XP and Windows Server 2003:
-
CPU: Intel 80486 compatible or better
-
RAM: 16 MB
-
Disk: 1 MB for the installation, 5 MB recommended for logs
-
-
Red Hat Linux (all versions):
-
CPU: Intel 80486 compatible or better
-
RAM: 16 MB
-
Disk: 1 MB for the installation, 5 MB recommended for logs
-
-
Debian GNU/Linux 2.2 and 3.0:
-
CPU: Intel 80486 compatible or better
-
RAM: 16 MB
-
Disk: 1 MB for the installation, 5 MB recommended for logs
-
-
Mandrake Linux 9.0 and newer:
-
CPU: Intel 80486 compatible or better
-
RAM: 16 MB
-
Disk: 1 MB for the installation, 5 MB recommended for logs
-
-
SuSE Linux 7.3 and newer:
-
CPU: Intel 80486 compatible or better
-
RAM: 16 MB
-
Disk: 1 MB for the installation, 5 MB recommended for logs
-
-
FreeBSD (all versions):
-
CPU: Intel 80486 compatible or better
-
RAM: 8 MB
-
Disk: 1 MB for the installation, 5 MB recommended for logs
-
-
Sun Solaris 8, 9 and 10:
-
CPU: Sun UltraSPARC (SPARCv9 compatible or better) or Intel 80486 or better
-
RAM: 16 MB
-
Disk: 1 MB for the installation, 5 MB recommended for logs
-
-
Sun Solaris 2.6:
-
CPU: Sun SPARC (SPARCv8 compatible or better)
-
RAM: 8 MB
-
Disk: 1 MB for the installation, 5 MB recommended for logs
-
-
HP HP-UX 11:
-
CPU: PA-RISC 1.1 compatible or better
-
RAM: 8 MB
-
Disk: 1 MB for the installation, 5 MB recommended for logs
-
-
IBM AIX 4.3:
-
CPU: Power 2 compatible or better
-
RAM: 8 MB
-
Disk: 1 MB for the installation, 5 MB recommended for logs
-
-
Compaq Tru64 4.0f:
-
CPU: Alpha compatible
-
RAM: 8 MB
-
Disk: 1 MB for the installation, 5 MB recommended for logs
-
-
Novell NetWare 5.1:
-
CPU: Intel 80486 compatible or better
-
RAM: 8 MB
-
Disk: 1 MB for the installation, 5 MB recommended for logs
-
In general, the actual requirements for the agents will vary depending on the amount of checks configured on the given agent, and the check-in interval configured.
2.2. Server Requirements
The requirements for the SysOrb Server depend on the number of NetChecks, AgentChecks and snmpChecks monitored. If only a small number of these need to be monitored the SysOrb Server can be run on very modest hardware. The more checks monitored, the higher the requirements for the SysOrb Server.
Please note: You would usually want to dedicate a machine to running the SysOrb Server, in order to minimize the risk of failures caused by other software, on your main monitoring Server. The SysOrb Server can, however, easily run on a system which is handling other tasks as well (such as a mail-server or name-server). It is not recommended to install the SysOrb Server on a system that is already very busy, as the SysOrb Server will consume resources, and some measurements (such as network response time measurements) will be disturbed and inaccurate if the system is too busy handling other tasks.
In the following minimum system requirements listing, the disk space requirements match small initial installations - the disk space requirements scale linearly as more monitored devices and checks are added to the setup.
Tip: In general, the database space requirements will grow with approximately one megabyte, per monitored check, and one megabyte per monitored node. So monitoring 20 devices on each of 10 different machines, will require approximately 210 megabytes of disk space.
In addition to this, reports in particular will also add to the disk space consumption. Reports are stored efficiently and a fully detailed report over the aforementioned 200 monitored checks will require much less than the 200 megabytes required for the full scale monitoring. Yet, when setting up a system in which many users have access to generate reports, report disk space consumption should be taken into account.
One should, of course, configure a disk space check with suitable warning and alert thresholds, for the filesystem on which the database reside, when configuring the agent on the SysOrb Server.
The recommended minimum requirements for running the SysOrb Server are listed below. The minimum recommended memory requirements match a SysOrb Server running a small (10-20 host) setup on a dedicated server machine. The requirements thus include the operating system requirements.
-
Microsoft Windows NT 4.0:
-
CPU: Intel Pentium compatible or better
-
RAM: 128MB
-
Disk: 40MB for installation, 100-250 MB recommended for logs and database
-
-
Microsoft Windows 2000 (professional or server), Windows XP or Windows Server 2003:
-
CPU: Intel Pentium II compatible or better
-
RAM: 256MB
-
Disk: 40MB for installation, 100-250 MB recommended for logs and database
-
-
Red Hat Linux (all versions):
-
CPU: Intel Pentium compatible or better
-
RAM: 96MB
-
Disk: 20MB for installation, 100-250 MB recommended for logs and database
-
-
Debian GNU/Linux 2.2 and 3.0:
-
CPU: Intel Pentium compatible or better
-
RAM: 96MB
-
Disk: 20MB for installation, 100-250 MB recommended for logs and database
-
-
Mandrake Linux 9.0 and newer:
-
CPU: Intel Pentium compatible or better
-
RAM: 128MB
-
Disk: 20MB for installation, 100-250 MB recommended for logs and database
-
-
SuSE Linux 7.3 and newer:
-
CPU: Intel Pentium compatible or better
-
RAM: 128MB
-
Disk: 20MB for installation, 100-250 MB recommended for logs and database
-
-
FreeBSD 4.5:
-
CPU: Intel Pentium compatible or better
-
RAM: 96MB
-
Disk: 20MB for installation, 100-250 MB recommended for logs and database
-
-
Sun Solaris 8, 9 and 10:
-
CPU: Sun UltraSPARC (SPARCv9 compatible or better)
-
RAM: 256MB
-
Disk: 30MB for installation, 100-250 MB recommended for logs and database
-
There are many other factors that affect overall system performance, than what has been listed in these minimum configuration recommendations. Large installations may need not just bigger but also faster storage. In general, more memory will help the disk I/O system.
Chapter 3. Installing SysOrb
3.1. Installing the SysOrb Server
The SysOrb Server is a fairly complex piece of software, yet the installation itself is simple. Please refer to Chapter 6 for detailed installation instructions for your particular server platform.
The Server may be able to run with its default configuration right after the install completes, but it is recommended that the configuration section is consulted before actually running the Server.
The SysOrb Server installation also contains the SysOrb Web interface. This section will not describe setup of any specific web-servers. The SysOrb Web Interface consists of CGI programs, which will work with any web-server supporting the CGI standard.
Notice for IIS users: Please make sure that you do not have third-party scripting extensions installed on the web server on which you will run the SysOrb Web interface. It is a common problem that these tools will attempt to interpret the SysOrb CGI programs as scripts written in some interpreted language (such as Perl). This will result in a non-functional SysOrb Web interface installation!
The SysOrb Web interface CGI programs are standard Win32 executables, and unless the configuration is overwritten by third party products, a standard IIS will work out of the box with SysOrb.
It is possible to manually override the third party scripting product configuration in the web server, to work around this problem and run both the scripting product and the SysOrb Web interface on the same web server. Please refer to the IIS documentation, or send an e-mail to
<support@sysorb.com>for assistance in this matter.
You can install the Web Interface wherever you please, you can even run a SysOrb Server on one platform (say, Solaris) and the Web Interface on another (for example Windows). If you do not want to install a Web-server on the SysOrb Server machine, you can install the SysOrb Server package on any other machine, and then disable the SysOrb Server there so that only the web interface remains active.
Note: When the SysOrb Web Interface is installed, you can use it to access and configure the SysOrb Server. The Web Interface will ask you for a username/password. For the default configuration this is:
Username: admin
Password: admtest
Domain: . (or just leave blank)
After you have logged in for the first time, make sure to change at least the password for the admin user. For more information about how to use the Web Interface, please refer to User's guide for the SysOrb Monitoring System.
3.1.1. Microsoft Windows NT / 2000 / XP / Server 2003
To install the SysOrb Server on machine running a Microsoft Windows operating system, you must have administrator access to that machine. Please make sure that you are logged on as the Local Administrator, or as another user with administrative privileges on the local machine.
The full Server and Web interface installation is contained in the file:
sysorb-server-3.4.1-4278.win32.ia32.exe
Download and run this file, and follow the instructions on screen during the install process.
Note: On the download page for SysOrb it is also possible to download an installation guide for Windows, which contains a screen for screen walk-through of the installation process.
During the installation you will be asked for a login and password for the user the Server should run as. If, after installation, you get an error page in your browser instead of the SysOrb Login page, or if the installation process cannot start the SysOrb Server, please check that the "SysOrb Server" service is running in the Service Control Manager. If this service is not running, chances are that the password for the service account was mistyped. You can correct this password in the Service Control Manager (by right-clicking on the "SysOrb Server" service and selecting "properties").
When the installation is finished you need to install your license file, if you have purchased SysOrb. See Section 3.2 for more information about how you do this. If you just want to test SysOrb, a test license is included in the installation.
Although the server is normally run with its default configuration from the installation procedure, it is recommended that you consult Chapter 6 for a more thorough description of all available configuration options.
The web-server should allow execution of CGI programs, and should be able to use the file index.cgi as the default for a directory. Apart from that, there are no special requirements for the server to work with the SysOrb web interface.
You should be able to see either an error page (showing a white background and an information-icon) from the SysOrb Web Interface if your SysOrb Server is not running, or you should see the login page.
If you cannot get to the SysOrb Login page, please refer to the "IIS Notice" at the very beginning of Section 3.1 for further information.
3.1.2. Red Hat Linux 6.2 and newer versions (including RHEL releases)
Red Hat 6.2 users should acquire the file:
sysorb-server-3.4.1-4278.rh62.ia32.rpm
Users of newer Red Hat releases should acquire the file:
sysorb-server-3.4.1-4278.rh72.ia32.rpm
Note: The Red Hat 7.2 package also works on all newer releases of Red Hat, i.e. 7.2, 8 and 9, Fedora and RHEL.
These files contain the entire SysOrb Server software package, and are available for download from http://www.evalesco.com.
In order to install the SysOrb Server, you must have root access to the system.
Install the SysOrb Server using your favorite RPM utility (for support on the RPM utility, see http://www.redhat.com), or using the plain rpm command:
rpm -Uvh sysorb-server-3.4.1-4278.rh62.ia32.rpm
You now have a SysOrb Server configured on your system. If you have purchased SysOrb, you will need to install your license file (See Section 3.2 for information about how you do this). See Chapter 6 for information on how to configure your newly installed SysOrb Server.
Type /etc/rc.d/init.d/sysorbd start to start the server for the first time. Per default SysOrb is set up to automatically start in runlevel 3 and 5.
The installation script will automatically configure an alias in your apache configuration for the SysOrb Web interface.
Note: The installation script tries to add the Alias to the Apache configuration files in /etc/httpd/conf/. If your system does not have the configuration files in this directory edit them manually to export the directory www in the SysOrb Web Interface installation directory as /sysorb/. Make sure you allow execution of CGI scripts. If you installed the SysOrb Web Interface from the above mentioned RPMs, the SysOrb Web interface installation directory is /var/sysorb/www.
Remember to restart the Apache web server after having installed the SysOrb Web Interface. The web server must re-read its configuration in order to recognize the new /sysorb/ alias.
When this is done, you should be able to see the login page (or an error page if your server is not yet running), by going to the URL http://localhost/sysorb/.
Note: If you are using a SELinux enabled Red Hat distribution, and are using SELinux policies on your web server, you have to perform the following steps for the webinterface to work:
cd /var/sysorb/www
chcon -t httpd_sys_content_t *.{png,gif,css,js}
chcon -t httpd_sys_script_exec_t *.cgi
Once these commands have been run, the webinterface will work. However, an audit will be generated each time one of the cgi-files are executed. In order to disable this audit, the selinux-policy-targeted-sources package must be installed. Once this is installed, perform the following steps:
cd /etc/selinux/targeted/src/policy/
echo "dontaudit httpd_sys_script_t ld_so_cache_t:file execute;" >> domains/misc/local.te
make reload
After this the audit message will be disabled.
If you have trouble getting this to work, please take a look in the error and access logs from your web-server. These logs often help by pointing out errors in the configuration files.
3.1.3. Debian Linux 2.2 and 3.0
Debian users should download the entire SysOrb Server software package named:
sysorb-server-3.4.1-4278.debian22.ia32.deb
In order to install the SysOrb Server, you must have root access to the system.
Install the packages with command:
dpkg -i sysorb-server-3.4.1-4278.debian22.ia32.deb
You now have a SysOrb Server configured on your system. If you have purchased SysOrb, you will need to install you license file (See Section 3.2 for information about how you do this), before starting SysOrb. Please consult Chapter 6 for detailed information about all possible configuration parameters.
Type /etc/init.d/sysorbd start to start the server for the first time. Per default SysOrb is set up to automatically start in runlevel 2.
The installation script will automatically configure an alias in your apache configuration for the SysOrb Web interface.
Note: The installation script tries to add the Alias to the Apache configuration files in /etc/apache/. If your system does not have the configuration files in this directory edit them manually to export the directory www in the SysOrb Web Interface installation directory as /sysorb/. Make sure you allow execution of CGI scripts. If you installed the SysOrb Web Interface from the above mentioned debian package, the Web-interface is located in /var/sysorb/www.
Please remember to restart the Apache web server after having installed the SysOrb Web Interface. The web server must re-read its configuration in order to recognize the new /sysorb/ alias.
Once this is done, you should be able to see the login page (or an error page if your server is not yet running) by going to the URL http://localhost/sysorb/.
If you have trouble making this work, please take a look in the error and access logs from your web-server. These logs often help by pointing out errors in the configuration files.
3.1.4. Mandrake Linux 9.0 and newer
Mandrake users can acquire the file:
sysorb-server-3.4.1-4278.mdk90.ia32.rpm
This file contains the entire SysOrb Server software package, and is available for download from http://www.evalesco.com.
In order to install the SysOrb Server, you must have root access to the system.
Install the SysOrb Server using the plain rpm command:
rpm -Uvh sysorb-server-3.4.1-4278.mdk90.ia32.rpm
You now have a SysOrb Server configured on your system. If you have purchased SysOrb, you will need to install your license file (See Section 3.2 for information about how you do this). See Chapter 6 for information on how to configure your newly installed SysOrb Server.
Type /etc/init.d/sysorb-server start to start the SysOrb Server for the first time. Per default SysOrb is set up to automatically start in runlevel 3 and 5.
The installation script will automatically configure an alias in your apache configuration for the SysOrb Web interface.
Note: The installation script tries to add the Alias to the Apache configuration files in /etc/httpd/conf/. If your system does not have the configuration files in this directory edit them manually to export the directory www in the SysOrb Web Interface installation directory as /sysorb/. Make sure you allow execution of CGI scripts. If you installed the SysOrb Web Interface from the above mentioned RPMs, the SysOrb Web interface installation directory is /var/opt/sysorb-server/www.
Remember to restart the Apache web server after having installed the SysOrb Web Interface. The web server must re-read its configuration in order to recognize the new /sysorb/ alias.
Once this is done, you should be able to see the login page (or an error page if your server is not yet running), by going to the URL http://localhost/sysorb/.
If you have trouble getting this to work, please take a look in the error and access logs from your web-server. These logs often help by pointing out errors in the configuration files.
3.1.5. SuSE Linux 7.3 and newer
SuSE Linux 7.3 users should acquire the file:
sysorb-server-3.4.1-4278.suse73.ia32.rpm
Users of newer SuSE Linux releases should acquire the file:
sysorb-server-3.4.1-4278.suse82.ia32.rpm
Note: The SuSE 8.2 package also works on all newer releases of SuSE.
These files contain the entire SysOrb Server software package, and are available for download from http://www.evalesco.com.
In order to install the SysOrb Server, you must have root access to the system.
Install the SysOrb Server using your favorite RPM utility (for support on the RPM utility, see http://www.redhat.com), or using the plain rpm command:
rpm -Uvh sysorb-server-3.4.1-4278.suse82.ia32.rpm
You now have a SysOrb Server configured on your system. If you have purchased SysOrb, you will need to install your license file (See Section 3.2 for information about how you do this). See Chapter 6 for information on how to configure your newly installed SysOrb Server.
Type /etc/init.d/sysorbd start to start the server for the first time. Per default SysOrb is set up to automatically start in runlevel 3 and 5.
The installation script will automatically configure an alias in your apache configuration for the SysOrb Web interface.
Note: The installation script tries to add the Alias to the Apache configuration files in /etc/httpd/. If your system does not have the configuration files in this directory edit them manually to export the directory www in the SysOrb Web Interface installation directory as /sysorb/. Make sure you allow execution of CGI scripts. If you installed the SysOrb Web Interface from the above mentioned RPMs, the SysOrb Web interface installation directory is /var/sysorb/www.
Remember to restart the Apache web server after having installed the SysOrb Web Interface. The web server must re-read its configuration in order to recognize the new /sysorb/ alias.
When this is done, you should be able to see the login page (or an error page if your server is not yet running), by going to the URL http://localhost/sysorb/.
If you have trouble getting this to work, please take a look in the error and access logs from your web-server. These logs often help by pointing out errors in the configuration files.
3.1.6. FreeBSD 4.5
FreeBSD users should download the file:
sysorb-server-3.4.1-4278.freebsd4.ia32.tgz
This file contains the SysOrb Server and Web interface software, and it is available from http://www.evalesco.com
In order to install the SysOrb Server, you must have root access to the system. After obtaining root access, follow the instructions below to install the software:
Type:
pkg_add sysorb-server-3.4.1-4278.freebsd4.ia32.tgz
to install the SysOrb Server.
When the installation has finished you need to install the license file, if you have purchased SysOrb. Consult Section 3.2 for information about how you do this. Otherwise a 30 day trial license is included in the package.
You now have SysOrb installed on your system. Please consult Chapter 6 for information on how to configure your SysOrb Server for operation.
To start the SysOrb server type /usr/local/etc/rc.d/sysorbd.sh start
The installation script will automatically configure an Alias in your web-server configuration for the SysOrb Web interface.
Note: The installation script tries to add the Alias to the Apache configuration files in /usr/local/etc/apache/. If your system does not have the configuration files in this directory, you need to edit them manually to export the directory www in the SysOrb Web Interface installation directory as /sysorb/. Make sure you allow execution of CGI scripts. If you installed the SysOrb Web Interface from the above mentioned Debian package, the Web-interface is located in /var/sysorb/www.
Remember to restart the Apache web server after having installed the SysOrb Web Interface. The web server must re-read its configuration in order to recognize the new /sysorb/ alias.
Once this is done, you should be able to see the login page (or an error page if your server is not yet running) by going to the URL http://localhost/sysorb/.
If you have trouble making this work, please take a look in the error and access logs from your web-server. These logs often help by pointing out errors in the configuration files.
3.1.7. Solaris 8, 9 and 10
Solaris users should download the entire SysOrb Server software package named:
sysorb-server-3.4.1-4278.solaris8.sparcv9.Z
In order to install the SysOrb Server, you must have root access to the system.
First unpack the file using:
uncompress sysorb-server-3.4.1-4278.solaris8.sparcv9.Z
You can now type:
pkgadd -d sysorb-server-3.4.1-4278.solaris8.sparcv9
You now have a SysOrb Server configured on your system. If you have purchased SysOrb, you will need to install you license file (See Section 3.2 for information about how you do this), before starting SysOrb. Please consult Chapter 6 for detailed information about all possible configuration parameters.
Type /etc/init.d/sysorbd start to start the server for the first time. Per default SysOrb is set up to automatically start in runlevel 3.
The SysOrb server must be accessed through a Web-interface, the .cgi and other files are placed in /opt/SYSOsoser/var/sysorb/www/. You must manually configure your web-server to be able to access this directory, and execute .cgi programs. Please remember to set up index.cgi as the default file to show, as the directory contains no index.html file.
Once this is done, you should be able to see the login page (or an error page if your server is not yet running) by accessing your web server.
If you have trouble making this work, please take a look in the error and access logs from your web-server. These logs often help by pointing out errors in the configuration files.
3.2. Installing a license file
If you have purchased a license for SysOrb, you need to install it after you finished the installation of SysOrb.
The installation is simple. Just overwrite the old sysorb.lic file with the one that you downloaded from the license manager. The default license location on Microsoft Windows is:
install-dir\Config\sysorb.lic
On Debian, SuSE and Red Hat Linux systems it is:
/etc/sysorb/sysorb.lic
On Mandrake systems it is:
/etc/opt/sysorb-server/sysorb.lic
On FreeBSD systems it is:
/usr/local/etc/sysorb/sysorb.lic
And on Solaris it is:
/etc/sysorb/sysorb.lic
Once the license file is in place, you will need to restart the SysOrb Server in order for it to notice the change of the license. If you are not certain that the installation of the new license worked, you can look in the server.log for a line that says:
[dbms]: License is valid for xx servers and xx agents.
3.3. Upgrading the SysOrb Server
This chapter describes the steps necessary to upgrade you SysOrb server to version 3.4.1.
If you are running SysOrb 2.6.x or 2.4.x you simply upgrade by stopping the SysOrb server, installing the new package, and starting the new SysOrb server afterwards. No database conversion is needed. However to get the most use of the new NodeClass features, we recommend that you import the default NodeClasses shipped with SysOrb 3.0.
3.3.1. Importing the default NodeClasses
SysOrb 3.0 ships with some default NodeClasses. These classes provides an example of how one can use the NodeClasses to create a hierarchy that can identify many different kinds of machines. Many of the default NodeClasses also contain information about how SysOrb can automatically discover whether a given node belongs to the NodeClass.
Note: You can only import the default NodeClasses when you have upgraded your SysOrb Server to at least version 3.0. Also note, that if you started with SysOrb 3.0, the NodeClasses are included in the default database.
To import the default NodeClasses you must use the command:
sysorb-importer -l username -f nodeclasses.xml
In most Unix systems the sysorb-importer program is located in the path. On Mandrake systems the program is located in /opt/sysorb-server/bin, and on Windows systems they are located in C:\Program Files\SysOrb Server\. The nodeclasses.xml is located in the same directory as the SysOrb database files. On most unix systems this is in /var/sysorb (Mandrake is /var/opt/sysorb-server). On Windows it is C:\Program Files\SysOrb Server\Config.
Upon execution, the sysorb-importer will ask you about the password for the username specified on the command line. Once entered the program will import all the NodeClasses and when it is finished, you can access the NodeClasses from the SysOrb Web Interface.
3.3.2. Upgrading from earlier than 3.0.3
If you are upgrading from a release earlier than 3.0.3, you must upgrade to SysOrb 3.0.3 or SysOrb 3.2 before you can proceed with the upgrade to the current version.
Upgrades from version 2.2.x: If you are running SysOrb version 2.2.x, please see the administrators guide for SysOrb 3.0.3 or SysOrb 3.2 for specific notes regarding the upgrade.
Because of various updates to the structure of the SysOrb database, the current version of SysOrb requires that the database has been upgraded to at least version 3.0.3 before the automatic upgrade procedure can continue. Once you have SysOrb 3.0.3 or SysOrb 3.2 running with your database, you can upgrade SysOrb to the current version. SysOrb will then automatically update your database.
3.4. Installing the SysOrb Agent
The SysOrb Agent is a very light piece of software, with very few configuration options. It retrieves its configuration from the SysOrb Server during normal operation, so the only configuration actually needed on the agent side (for the basic agent functionality) is the list of SysOrb servers to which the Agent should check in, and a name and a SysOrb domain used by the agent to identify itself to the SysOrb server.
You can use the DNS name of the host as the Agent name, or you can use the host's IP address. Both options will allow the SysOrb server to perform NetChecks and snmpChecks on the host too, provided that the given DNS name or IP address is actually reachable from the SysOrb Server. If you do not need to perform NetChecks or snmpChecks on the host, the Agent name can be chosen freely.
On the SysOrb server you are supposed to create a node with the exact same name as specified in the configuration, in the specified domain.
Tip: Node Labels: It is usually undesirable to have a list of IP addresses displayed in the web interface, as the sole means of identifying one's monitored systems. Yet, it is sometimes a requirement that IP addresses be used for the agent names (for example, if the agent hosts do not have DNS names).
Node Labels are a solution to this problem. When configuring the agent, in the web interface, the user is provided with both an agent host name entry field (which is mandatory), and an optional "node label" entry field. Any descriptive name can be inserted into the node label field - it will then be displayed in the usual web interface host listings afterwards. The node label does not affect interaction with either NetChecks, SNMPChecks, or the agent - it is purely a displayed name.
Notice: When upgrading from version 2.4.0 you must take special care of any log checks activated on a SysOrb Agent. See Section 3.5 for details.
To actually tell the SysOrb Server to monitor a specific SysOrb Agent you need to use the SysOrb Web Interface. See User's Guide to the SysOrb Monitoring System for more information on how to use the SysOrb Web Interface.
3.4.1. Microsoft Windows NT / 2000 / XP / Server 2003
The SysOrb Agent installation package is named:
sysorb-agent-3.4.1-4278.win32.ia32.exe
This file can be downloaded from http://www.evalesco.com. Simply run the file to start the installation procedure.
When following the instructions in the installation program, please notice the dialog asking for SysOrb Server Name, SysOrb Domain and SysOrb Agent Name. If the SysOrb Server Name is incorrectly entered the SysOrb Agent will not be able to send monitoring information to the SysOrb Server. If the names cannot be entered during installation they can later be changed as described in Chapter 9 of this document.
Note: On the SysOrb download page an installation HOWTO is available, which provides a screen by screen walk-through of the Agent installation.
3.4.2. Microsoft Windows Server 2003 on Itanium
The SysOrb Agent installation package is named:
sysorb-agent-3.4.1-4278.win64.ia64.exe
This file can be downloaded from http://www.evalesco.com. To start the installation procedure, either double click on the downloaded file, or execute the following command in the Command Prompt:
msiexec -i sysorb-agent-3.4.1-4278.win64.ia64.exe
When following the instructions in the installation program, please notice the dialog asking for SysOrb Server Name, SysOrb Domain and SysOrb Agent Name. If the SysOrb Server Name is incorrectly entered the SysOrb Agent will not be able to send monitoring information to the SysOrb Server. If the names cannot be entered during installation they can later be changed as described in Chapter 9 of this document.
Upgrade note: If you need to manually upgrade the SysOrb Agent package, you can proceed in two ways. The simplest way is to start by uninstalling the SysOrb Agent, through Add/Remove Programs, and then install the new package. However that will remove the configuration and requires that the key is released on the SysOrb Server. The other solution is to run the following command in the Command Prompt:
msiexec -i sysorb-agent-3.4.1-4278.win64.ia64.exe REINSTALL=ALL REINSTALLMODE=vomus
Performing the upgrade this way, will retain all your configuration, and will not require a release of the Agent's key
3.4.3. Red Hat Linux 5.2, 6.2, 7.2 and newer
First you should download the appropriate package. For Red Hat 5.2 it is the file named:
sysorb-agent-3.4.1-4278.rh52.ia32.rpm
For Red Hat 6.2 the file name is:
sysorb-agent-3.4.1-4278.rh62.ia32.rpm
Finally, for Red Hat 7.2 or newer it is:
sysorb-agent-3.4.1-4278.rh72.ia32.rpm
You can download these files from http://www.evalesco.com. Also, you should make sure that you have root access to the system on which you are installing the Agent Software.
Note: The package for Red Hat 7.2, also works on newer versions of Red Hat, i.e. 7.3, 8 and 9, Fedora and RHEL releases.
Use the RPM utility to install the package. Example:
rpm -Uvh sysorb-agent-3.4.1-4278.rh52.ia32.rpm
This should successfully install the SysOrb Agent on your system.
Please read Chapter 9 before you start the agent. The agent must know where to find its server before it will be able to do anything useful.
In order to start the SysOrb Agent after the installation, type in the command: /etc/rc.d/init.d/soagent start. Per default the Agent is configured to start in the runlevels 3 and 5.
3.4.4. Debian GNU/Linux 2.2 and 3.0
Debian users can download the installation package named:
sysorb-agent-3.4.1-4278.debian22.ia32.deb
The file can be downloaded from http://www.evalesco.com. Also, you should make sure that you have root access to the system on which you are installing the agent software.
Use the dpkg utility to install the package:
dpkg -i sysorb-agent-3.4.1-4278.debian22.ia32.deb
This should successfully install the SysOrb Agent on your system.
Please read Chapter 9 before you start the agent. The agent must know the name of it's server, to be able to checkin.
Then type /etc/init.d/soagent start to start the agent for the first time. Per default the Agent is set up to automatically start in runlevel 2.
3.4.5. Mandrake Linux 9.0 and newer
Mandrake users can download the installation package named:
sysorb-agent-3.4.1-4278.mdk90.ia32.rpm
This file can be downloaded from http://www.evalesco.com. Also, you should make sure that you have root access to the system on which you are installing the Agent Software.
Use the RPM utility to install the package. Example:
rpm -Uvh sysorb-agent-3.4.1-4278.mdk90.ia32.rpm
This should successfully install the SysOrb Agent on your system.
Please read Chapter 9 before you start the agent. The agent must know where to find its server before it will be able to do anything useful. You can also run the following command to have the agent detect a suitable configuration if you have a running SysOrb server on the local subnet.
/etc/rc.d/init.d/sysorb-agent configure
In order to start the SysOrb Agent after the installation, type in the command: /etc/rc.d/init.d/sysorb-agent start. Per default the Agent is configured to start in the runlevels 3 and 5.
3.4.6. SuSE Linux 7.3, 8.2 and newer
For installation on SuSE Linux 7.3, you should download the file named
sysorb-agent-3.4.1-4278.suse73.ia32.rpm
If you use SuSE Linux 8.2 or newer, you should download
sysorb-agent-3.4.1-4278.suse82.ia32.rpm
from http://www.evalesco.com. Also, you should obtain root access to the system where you wish to install the SysOrb Agent.
Use the RPM utility to install the package. Example:
rpm -Uvh sysorb-agent-3.4.1-4278.suse73.ia32.rpm
This should install the SysOrb Agent on your system.
Please read Chapter 9 before you start the agent. The agent must know where to find its server before it will be able to do anything useful.
In order to start the SysOrb Agent by hand, use the command: /etc/inid.d/soagent start. In order to make SuSE Linux 7.3 start the SysOrb Agent when it boots, you should edit the file /etc/rc.config, and change the line START_SOAGENT="no" to START_SOAGENT="yes". This is not necessary on SuSE Linux 8.2 or newer.
3.4.7. FreeBSD 3.5 and 4.5
To install the SysOrb Agent on a machine running FreeBSD 3.5, download the file named:
sysorb-agent-3.4.1-4278.freebsd3.ia32.tgz
If you are running FreeBSD 4.5, you should download the file named:
sysorb-agent-3.4.1-4278.freebsd4.ia32.tgz
Both files can be downloaded from http://www.evalesco.com. This package contains everything needed in order to make a computer check in status information regularly to the SysOrb Server.
Note: The FreeBSD 4.5 agent also work with newer releases of FreeBSD, such as FreeBSD 4.8 and 5.0
Please note, you must have root access to the system on which you are installing this software.
You can now type:
pkg_add sysorb-agent-3.4.1-4278.freebsd3.ia32.tgz
This will install the SysOrb Agent for FreeBSD 3.5.
If you are installing the SysOrb Agent on FreeBSD 4.5, you should instead type:
pkg_add sysorb-agent-3.4.1-4278.freebsd4.ia32.tgz
Your SysOrb Agent should now be installed. Please read Chapter 9 to see how the /usr/local/etc/sysorb/agent.conf agent configuration file should be set up.
In order to start the SysOrb Agent after the installation, type /usr/local/etc/rc.d/soagent.sh start.
3.4.8. Sun Solaris 8, 9 and 10
To install the SysOrb Agent on a machine running Solaris 8, you should download the file named:
sysorb-agent-3.4.1-4278.solaris8.sparcv9.Z, if using UltraSPARC processor or
sysorb-agent-3.4.1-4278.solaris8.ia32.Z, if using Intel processor
These files is available from http://www.evalesco.com. The packages contains everything needed in order to install the SysOrb Agent.
Please note, you must have root access to the system on which you are installing this software.
First unpack the file (using the UltraSPARC version as example):
uncompress sysorb-agent-3.4.1-4278.solaris8.sparcv9.Z
You can now type:
pkgadd -d sysorb-agent-3.4.1-4278.solaris8.sparcv9
Your SysOrb Agent should now be installed. Please read Chapter 9 to see how the /etc/sysorb/agent.conf agent configuration file should be set up.
In order to start the SysOrb Agent after the installation, type /etc/init.d/soagent start.
3.4.9. Sun Solaris 2.6
To install the SysOrb Agent on a machine running Solaris 2.6, you should download the file named:
sysorb-agent-3.4.1-4278.solaris26.sparcv8.Z
This file is available from http://www.evalesco.com. The package contains everything needed in order to install the SysOrb Agent.
Please note, you must have root access to the system on which you are installing this software.
First unpack the file using:
uncompress sysorb-agent-3.4.1-4278.solaris26.sparcv8.Z
You can now type:
pkgadd -d sysorb-agent-3.4.1-4278.solaris26.sparcv8
Your SysOrb Agent should now be installed. Please read Chapter 9 to see how the /etc/sysorb/agent.conf agent configuration file should be set up.
In order to start the SysOrb Agent after the installation, type /etc/init.d/soagent start.
3.4.10. HP HP-UX 11
To install the SysOrb Agent on a machine running HP-UX 11, download the file named:
sysorb-agent-3.4.1-4278.hpux11.parisc.depot
The file can be downloaded from http://www.evalesco.com. This package contains everything needed in order to install the SysOrb Agent.
Please note, you must have root access to the system on which you are installing this software.
You type:
swinstall -v -s /absolute/path/to/sysorb-agent-3.4.1-4278.hpux11.parisc.depot SysOrb-Agent
Caveat: It is essential that you specify an absolute path to the depot file, (one starting with a /). If this is not done, the swinstall utility will not properly recognize that you are trying to install a depot file.
Your SysOrb Agent should now be installed. Please read Chapter 9 to see how the /etc/sysorb/agent.conf agent configuration file should be set up, or you can run the following command to have the agent detect a suitable configuration if you have a running SysOrb server on the local subnet.
/sbin/inid.d/soagent configure
After configuring the Agent, you can start it by executing /sbin/init.d/soagent start
3.4.11. IBM AIX 4.3
To install the SysOrb Agent on a machine running AIX 4.3, download the file named:
sysorb-agent-3.4.1-4278.aix43.pwr2.bff
The file can be downloaded from http://www.evalesco.com. This package contains everything needed in order to install the SysOrb Agent.
Please note, you must have root access to the system on which you are installing this software.
You type:
installp -a -d sysorb-agent-3.4.1-4278.aix43.pwr2.bff all
Your SysOrb Agent should now be installed. Please read Chapter 9 to see how the /etc/sysorb/agent.conf agent configuration file should be set up, or you can run the following command to have the agent detect a suitable configuration if you have a running SysOrb server on the local subnet.
sysorb-testconf /etc/sysorb/agent.conf configure
After configuring the Agent, you can start it by executing /usr/sbin/soagent
3.4.12. Compaq Tru64 4.0f
To install the SysOrb Agent on a machine running Compaq Tru64, you should download the file named:
sysorb-agent-3.4.1-4278.tru64.alpha.tar.gz,
This file is available from http://www.evalesco.com. The package contains everything needed in order to install the SysOrb Agent.
Please note, you must have root access to the system on which you are installing this software.
First uncompress the file:
gunzip sysorb-agent-3.4.1-4278.tru64.alpha.tar.gz
Then untar the file:
tar xvf sysorb-agent-3.4.1-4278.tru64.alpha
This will create the directory sysorb-agent-3.4.1-4278. Use the setld command to install the agent:
setld -l sysorb-agent-3.4.1-4278
Follow the instructions printed by the setld program, and the SysOrb Agent will be installed. Please read Chapter 9 to see how the /usr/opt/AGT341/etc/agent.conf agent configuration file should be set up.
In order to start the SysOrb Agent after the installation, type /sbin/init.d/soagent start.
3.4.13. Novell NetWare 5.1
To install the SysOrb Agent on Netware, you need to download the ZIP archive named:
sysorb-agent-3.4.1-4278.nw51.zip
The file can be downloaded from http://www.evalesco.com. This package contains everything needed in order to install the SysOrb Agent.
On your workstation, follow these steps in order to create a NetWare installation floppy for the agent:
-
First, unzip the archive
-
Format a floppy disk - please make sure to use a fresh floppy disk to avoid errors when installing. Old floppy disks are unreliable, and floppy disk errors are common on old media.
-
Label the floppy disk - the disk should be named SOAGENT1.
-
Now copy the extracted files from the ZIP archive, onto the floppy disk.
Labeling the floppy disk: When labeling the floppy disk under Windows, users have reported various problems using the graphical user interface to label the disks. A floppy disk can safely be labeled using the command line tools though. Start up a command line (choose "run" in the Start menu, and type either cmd or command), and type the following: label a:soagent1
Now the install floppy disk is ready to be used on your NetWare servers. Follow the installation steps below, to install the agent on your server. The installation happens using the NetWare Console on the server where you are installing the agent
-
Start the nwconfig utility from the NetWare Console
-
Select the Product Options menu option.
-
Select the Install a product not listed menu option.
-
Please make sure that the installation floppy is in the drive, then press enter to allow the nwconfig utility to search for packages on the floppy drive.
-
You should now have the option to install the SysOrb Agent and it's associated configuration file.
You must now configure your SysOrb Agent. Use the edit editor to edit the agent configuration file SYS:SYSORB\AGENT.CFG. Typically you will need to set three parameters in the file:
-
server_list: This is the name of the SysOrb Server - the name or IP address set here, must be the name or the IP address of the SysOrb Server, and the server must be reachable from the Agent machine
-
name: This is the name of the Agent machine. This must match exactly the name given for the agent host when configuring it in the Web interface.
-
domain: This is the SysOrb domain in which the agent host was placed, in the Web interface. For example, if the agent was placed in the root domain, the domain path is simply ".". If it was placed in a folder named "Sales", the domain is "Sales". Sub-folder names are separated by periods, like DNS domain names, so a folder named "Research" placed under a folder named "Head", will correspond to "Head.Research".
Finally, you can load the agent NLM. We recommend that you use the following command line to load the module:
load protected sys:\sysorb\soagent.nlm
In order to ensure that the agent starts again automatically, if the server is rebooted, this command line should be appended to the SYS:SYSTEM\AUTOEXEC.NCF file.
3.5. Upgrading LogChecks from SysOrb 2.4.0
The LogChecks configuration has changed between SysOrb version 2.4.0 and 2.4.1. This means that any LogChecks configured on a version 2.4.0 system must be manually reconfigured on the new version in order to work after upgrading.
In version 2.4.0 all configuration data including paths to logfiles and matching rules was defined on the agent in the log configuration file (default: log.conf), specified in the agent configuration (default: agent.conf). This would make the log files available for monitoring on the SysOrb Server.
In version 2.4.1 and up only the paths for the logfiles to monitor is defined in the log configuration file. The matching rules configuration has been moved to the SysOrb server. Furthermore, the LogCheck logic has been much improved. This means you have a few more configuration options.
In order to move version 2.4.0 LogChecks to version 2.4.1 you need to do the following after upgrading your SysOrb server (See the User's Guide and Section 9.5 for more information on LogChecks):
-
Rename the log configuration file (default: log.conf) on the SysOrb Agent host to log.conf.old.
As an example, we take that the above file contained a LogCheck definition like this:
[Syslog] logfile='/var/log/messages'; incremental; rules '^RPC: garbage': warn; '^nfs:.*server OK': ok; '^nfs:': warn; -
Make a new log configuration file in place of the original and add the path of each log file you want to monitor, one path per line.
With the above example, you would insert this one line:
/var/log/messages -
Auto-upgrade the agent, or manually upgrade the Agent.
-
If doing manual upgrade, make sure to restart the SysOrb Agent.
-
Using the Web interface go to the AgentCheck configuration dialog. In order to do this, click configure, find the host and click edit. Click AgentChecks. Click 'Rescan'. Wait for next Agent Checkin (default: 30 seconds) and Click 'Show all'. Click the 'log checks' folder and click down through the tree to reach the desired log file. Click '[Add]' on the log file to be monitored.
-
Copy the rule lines (not including the rules keyword itself) from the 'log.conf.old' file, to the Rules text box in the web interface.
With the above example, you would enter the following in the rules field:
'^RPC: garbage': warn; '^nfs:.*server OK': ok; '^nfs:': warn; -
Click OK.
Be sure to read the User's Guide and Section 9.5 for more information the LogChecks and the enhanced configuration options.
3.6. Unattended installation on Windows
Both the SysOrb Server and SysOrb Agent installation packages have built-in support for unattended installation. This support makes it possible to install either the SysOrb Server or the SysOrb Agent without human intervention. The choices made during an installation are simply recorded into a file (called the response file), which is then used during the unattended installation. The process works the same way for both the Server and Agent packages.
3.6.1. Unpacking the installation pacakge
The installation package for both the Agent and the Server is compressed into a single executable. In order to perform an unattended installation, you will have to decompress this installation package. This can be done with WinZIP available from http://www.winzip.com.
All the files in the installation package will be located in a subdirectory called Disk1. All the files in this directory need to be kept together, and none of the can be renamed.
3.6.2. Recording the response file
In order to perform an unattended installation, a response file is needed. This file contains information about the choices the installation program should make. The file is a plain text file, so it can be edited by hand. However, the easiest way to obtain a working response file, is to let the installation program record one, and then edit it if necessary.
In order to record a response file, you will need to start a command line. In this you must change the directory to the place where the setup files are located. If you unpacked the installation package in C:\TEMP\SysOrb, you must issue the command:
cd C:\TEMP\SysOrb\Disk1
When this is done you are ready to start the installation. This is done by issuing the command:
Setup.exe -r -f1c:\TEMP\SysOrb\Response.txt
The -r part of the command line tells the installation program that it should create a response file, based on the choices made by the user during the installation process. The -f1c:\TEMP\SysOrb\Response.txt part tells it that the name of the response file should be c:\TEMP\SysOrb\Response.txt
When this command is executed, the normal installation will start. The choices made during the installation will be reflected in the response file. When the installation finishes, the file c:\TEMP\SysOrb\Response.txt has been created. This file has to be copied somewhere safe, so it can be located again, when the the unattended installation is needed.
3.6.3. Performing the unattended installation
When a response file for the installation has been created, the installation can use this file to install SysOrb with the same choices that where made during the installation that created the response file.
In order to do this, start by copy the response file to the system that SysOrb should be installed on. Then start a command line. In this you must change the directory to the place where the setup files are located. If you unpacked the installation package in C:\TEMP\SysOrb, you must issue the command:
cd C:\TEMP\SysOrb\Disk1
When this is done you are ready to start the unattended installation. This is done by issuing the command:
Setup.exe -s -f1c:\TEMP\SysOrb\Response.txt
The -s part of the command line tells the installation program that it should perform a silent installation. The -f1c:\TEMP\SysOrb\Response.txt part, tells it that the installation must be performed with the response file placed in c:\TEMP\SysOrb\Response.txt as a template.
3.6.4. Unattended installation of an Agent
When performing an unattended installation of a SysOrb Agent that already is installed on a SysOrb Server, a little more work is needed to allow the agent to checkin without releasing its key on the SysOrb Server.
The Agent keeps some state in the Windows Registry, including the Agents key which is to identify the Agent for the SysOrb Server. If this key is lost, the Agent will not be able to communicate with the SysOrb Server before the Agents key is released on the server.
In order to avoid having to release the key on the server, you must perform the following steps, on the machine where the SysOrb Agent is running:
-
Stop the SysOrb Agent service
-
Start up the Registry Editor (regedit.exe).
-
Click through the tree until you reach the folder \HKEY_LOCAL_MACHINE\SOFTWARE\SysOrb\SOAgent\Variables.
-
Choose Export Registry File from the menu, and choose to only export the Selected branch. Save this in a place where you can find it again.
-
Locate the saved file, and right click it. Choose Edit from the menu.
-
In the window that appears, delete all lines containing an equal sign, except for the one called hostkey. The file should now look something like:
Windows Registry Editor Version 5.00 [HKEY_LOCAL_MACHINE\SOFTWARE\SysOrb\SOAgent\Variables] "hostkey"="12345678901234567890...." -
This registry file must then be merged on the server where you wish to perform the unattended installation, before the SysOrb Agent is started. So either before the unattended installation begins, or after the installation has finished, but before the Agent service is started.
Chapter 4. ServerCluster
In large networks the performance of SysOrb can be improved by clustering several SysOrb Servers. The most important reasons for using ServerCluster are:
-
Performance: Since the servers in a ServerCluster distribute the needed Agent checkins and NetChecks between them, checks can be performed at a higher rate.
A ServerCluster provides full mirroring of all data in the database - one should therefore be aware, that performance problems directly related to the I/O subsystem of one SysOrb Server, cannot be solved simply by moving to a ServerCluster setup.
-
Redundant servers: If one of the SysOrb Servers in the cluster somehow fails or disappears from the network (e.g. due to hardware faults) the other SysOrb Servers notice this and fill in for the missing server. On the agent side, SysOrb Agents will cycle through their list of SysOrb Servers if they are unable to contact a server.
If the connection between two groups of SysOrb Servers in the cluster is lost, each group will perform all checks on the clusters NetChecks and snmpChecks. When the connection is restored, the two groups will synchronize their databases using the best results for the tests.
To setup a number of SysOrb Servers as a cluster, each SysOrb Server needs to have a list of all the SysOrb Servers in the cluster, including itself. The hosts must be mentioned in the same order, on all SysOrb Servers, or the cluster will not work correctly. The cluster members can run different operating systems, but must be running exactly the same version (including build number) of the SysOrb Server software.
See the Server Configuration section for more details on how to configure the SysOrb Servers.
Note: Clustered SysOrb Servers do not automatically monitor each other, but this can quite easily be achieved by setting up the SysOrb Servers as SysOrb Agents as well. It is highly recommended to always run a SysOrb Agent on the SysOrb Server machine.
Chapter 5. Auto-upgrading the SysOrb Agent
Once the SysOrb Agent is installed on every monitored machine, you will not have to upgrade the Agent manually for each new release of SysOrb. Instead a special package containing the Agent for every platform will be distributed with the SysOrb Server.
Notice: When upgrading from version 2.4.0 you must take special care of any log checks activated on a SysOrb agent. See Section 3.5 for details.
Every time the Agent checks in to the Server, it will check whether a new version of itself is available. If that is the case, it will download the new version and upgrade itself without human intervention.
In order to enable this, all you have to do is copy the .spm file containing the new Agent into /var/sysorb/upgrade on non-Windows systems (except Mandrake, where the directory is located at /var/opt/sysorb-server/upgrade), or C:\Program Files\SysOrb Server\Upgrade on Windows. The the Agents will start downloading the next time they check in.
Troubleshooting tip: If the agents do not upgrade, you can try enabling the log_upgrade_debug switch on the SysOrb Server and restart it. (See Chapter 6 for details on configuring the Agent) Within the first about 50 lines written in server.log after the restart should be a line like
Scanning for autoupgrade packages in...and immediately after the server will list the package files it finds.
The agent/server protocol is designed with the utmost care for security. The server has to authenticate itself using a 128 bit key, which is also used for encryption of subsequent communication. The chances of a hacker intercepting the transfer of an upgraded Agent executable are minimal. However, if the machine running the SysOrb Server is otherwise compromised, a clever hacker would be able to trick the SysOrb Server into sending any file as an Agent upgrade, thereby gaining access to all the machines running Agents.
If you will not risk this on your mission critical machines, you can instruct individual Agents not to download executables from the SysOrb Server, no matter what the server says. (See Chapter 9 for details on configuring the Agent)
5.1. Auto-upgrade with SysOrb Satellites
The installed auto-upgrade packages are local to the SysOrb Server or Satellite they are installed on. This means that the auto-upgrade packages needs to be installed on all SysOrb Servers or Satellites where agents check-in, in order to upgrade all the agents.
Chapter 6. SysOrb Server Configuration
The SysOrb Server offers a wide range of configuration options for both debugging and troubleshooting, as well as for performance tuning and administrative convenience.
The different ports of the server have similar configuration options, but the actual way in which the configuration options are accessed differ, depending on which platform you are running. On Unix-like systems the configuration is stored in files and on Microsoft Windows NT / 2000 the configuration is stored in the system registry.
After a configuration change, you will have to restart the SysOrb Server service (a complete server reboot is not necessary).
6.1. Microsoft Windows NT / 2000
Server configuration is done in a program called SysOrb Config which can be found in the start menu. This program includes detailed descriptions of each option.
The program is located in the Programs folder specified during the installation.
6.2. Unix-like systems (FreeBSD, Linux and Solaris)
The configuration file is located in:
/etc/sysorb/server.conf
on all Unix-like platforms, except FreeBSD where it is located in:
/usr/local/etc/sysorb/server.conf
and Mandrake where it is located in:
/etc/opt/sysorb-server/server.conf
This file contains the configuration for the server. If you change this file you must restart the server for the changes to take effect.
You can however make the server reopen its log file by sending a hangup signal (SIGHUP) to the sysorbd process. This is used in the logrotate script that accompanies the server on Linux.
The options of primary interest are likely to be the location of the database files, and the logging options. See the reference for details.
6.3. Configuration Options Reference
The configuration directives for the SysOrb Server fall into nine categories:
-
Logging Options defines where the SysOrb Server should keep its logfiles and what information should be logged.
-
Database Options defines where the data files for the SysOrb Server's database should be stored.
-
Network Connection Manager Options defines what TCP port the SysOrb Server should use and how many concurrent connections it will accept.
-
NetCheck Manager Options defines maximum number of NetChecks (e.g. mail server check).
-
General SysOrb Server Options defines other options for the SysOrb Server.
-
Alert Dispatcher Options defines how and to whom alerts will be given.
-
SNMP options Options defines various apects on how SysOrb should perform SnmpChecks.
-
ServerCluster Options defines options for clustering several SysOrb Servers.
-
Grid Options defines options for a grid of SysOrb servers and satellites.
6.3.1. Logging Options
logdir(path)-
This is the location of the logfile. It is not the filename, but the directory in which the file should be. The file will be named server.log within the specified directory.
Default value (Unix): /var/log/sysorb
Default value (NT/2000): install-dir\Config
log_assert(boolean)-
Whether the server should log critical internal errors.
Default value:
true log_dbms_cpu(boolean)-
Whether the database subsystem should log information about how it spends its time.
Default value:
false log_dbms_debug(boolean)-
Whether the database subsystem should log informational messages.
Default value:
false log_dbms_anomaly(boolean)-
Whether the database subsystem should log information about certain situations, e.g. another part of sysorb requesting infomation about an object which does not exist in the database. Please note that there can be perfectly valid reasons for such queries, for instance the NetCheck engine requesting information about a NetCheck wich has just been deleted by a user.
Default value:
false log_tsdb_debug(boolean)-
Whether the time series database subsystem should log informational messages.
Default value:
false log_socketio_debug(boolean)-
Whether the network connection manager should log informational messages.
Default value:
false log_keygen_debug(boolean)-
This option enables informational messages regarding Diffie-Hellman prime/generator pair generation.
Default value:
false log_snmp_debug(boolean)-
Whether the SNMP subsystem should log informational messages.
Default value:
false log_snmpval_debug(boolean)-
Whether the SNMP subsystem should log informational messages about the values it receive.
Default value:
false log_general_debug(boolean)-
Whether general debugging information should be logged.
Default value:
false log_sched_debug(boolean)-
Whether the event-scheduler should log informational messages. These messages are usually not very interesting.
Default value:
false log_alarm_debug(boolean)-
Whether the central decision-making process (the alarm logic) should log informational messages.
Default value:
false log_alert_debug(boolean)-
Whether the alert dispatcher should log informational messages, which can be used for troubleshooting mail-server or modem dialing problems. Set this to "true" if you have problems getting alerts via e-mail or numerical pager.
Default value:
false log_broadcast_debug(boolean)-
Whether the ServerCluster module should output informational log-messages.
Default value:
false log_brdc_frag_debug(boolean)-
This option enables the logging of debug messages relating to datagram fragments within a ServerCluster
Default value:
false log_time_debug(boolean)-
Whether the Time Synchronization which is enabled when using ServerCluster should output informational log-messages.
Default value:
false log_netcheck_debug(boolean)-
This option enables informational messages from the NetCheck module.
Default value:
false log_icmpcheck_debug(boolean)-
This option enables informational messages from the ICMP (ping) module.
Default value:
false log_ssl_debug(boolean)-
This option enables informational regarding the loading of the SSL library used for SSL based NetChecks..
Default value:
false log_report_debug(boolean)-
This option enables informational messages from the Report module.
Default value:
false log_forecast_debug(boolean)-
This option enables informational messages from the Forecast module.
Default value:
false log_upgrade_debug(boolean)-
This option enables informational messages regarding auto upgrade of the agents.
Default value:
false log_scan_debug(boolean)-
This option enables logging when the SysOrb Server receives scan requests from agent machines.
Default value:
false log_nodeclass_debug(boolean)-
This option enables logging about the NodeClass check confiugration engine.
Default value:
false log_router_debug(boolean)-
This option enables informational messages regarding grid routing.
Default value:
false log_link_debug(boolean)-
This option enables informational messages regarding grid link establishment.
Default value:
false log_station_debug(boolean)-
This option enables informational messages regarding grid station to station communication.
Default value:
false log_gridrpc_debug(boolean)-
This option enables informational messages regarding the grid RPC communication.
Default value:
false log_gridsync_debug(boolean)-
This option enables informational messages regarding grid synchronisation.
Default value:
false
6.3.2. Database Options
layout_conf(filename)-
This is the file from which the database back-end reads the layout information which the Web-interface needs.
Default value (Unix): /var/sysorb/layout.conf
Default value (NT/2000): install-dir\Config\layout.conf
dbms_tsdb(filename)-
This is the file in which the database back-end will store the time-series database data. This file can become rather large if many devices are monitored. The file grows with approximately 1 megabyte per monitored check.
Linux-based systems note: You can specify either a file on your filesystem, or a device-file for a block-device (such as a disk partition or a RAID device) here.
Default value (Unix): /var/sysorb/main.tsdb
Default value (NT/2000): install-dir\Config\main.tsdb
dbms_odb(filename)-
This is the file that keeps all configuration information about hosts, services, devices, users, groups, etc. It is the entire hierarchical configuration of your monitored systems and their users. This file also keeps passwords for user accounts, so you should make sure that its permissions are set correctly if you run the SysOrb Server on a multiuser system with other interactive users.
Default value (Unix): /var/sysorb/main.odb
Default value (NT/2000): install-dir\Config\main.odb
dbms_odbj(filename)-
This is the journal file for the aforementioned main.odb meta-data database file. The journal provides an efficient method for the SysOrb Server to guarantee data consistency in the meta database. The default size of this file is 8 megabytes, and the size will never change during the lifetime of the database.
Default value (Unix): /var/sysorb/main.odbj
Default value (NT/2000): install-dir\Config\main.odbj
Performance tip: The journal can be placed on a small but fast storage device, in order to improve overall meta database performance. With the modest size of the journal, it is even possible to place it on a battery backed SDRAM device.
dbms_buffer_blocks(number of blocks)-
This option specifies how many ODB blocks (default block size is 8 KiB) the sysorb-dbms process will keep in memory, to speed up normal database queries and other common operations. The larger the value, the more memory the database process will consume. The memory overhead can be estimated by multiplying the number of blocks with the block size - for example, 4096 blocks will consume approximately 4096*8 KiB = 32 megabytes of memory.
Default value:
4096 tsdb_buffer_entries(number of entries)-
This option specifies how many data records (per check) there can be in the write buffer allocated allocated for each check. Enlarging this buffer will give the time series more freedom in choosing when to flush data to disk, possibly increasing performance. The cost of an increase is a larger memory footprint of the sysorb-tsdb process.
Default value:
64 tsdb_buffer_write_min(number of entries)-
This option controls how many entries we want in the entry write buffer before we start flushing entries to disk. The larger this number, the fewer writes to disk will be needed. It is, however, advised that this number stays well below the
tsdb_buffer_entriesparameter, so that the write buffers do not fill up. If a write buffer is filled, flushing of the buffer will be forced, thereby limiting the freedom the database has to choose a convenient time to flush the data.Default value: one quarter of
tsdb_buffer_entries tsdb_buffer_age_max(seconds)-
This is the maximum allowed age (measured in seconds) of an entry in the write buffer. If an entry older than this is found in a write buffer, entries from that buffer will be flushed (no matter if
tsdb_buffer_write_minis exceeded or not. The larger this option is, the more freedom the database will have in choosing when to flush data. However, if the SysOrb Server machine loses power or is in some other way shut down without giving sysorb-tsdb a chance to flush the write buffers from memory to disk, all records in the write buffers will be lost. This option is used to limit the maximum amount of data loss.Default value:
600 tsdb_buffer_flush_batch(number of buffers)-
The time series database will go through its live write-buffers in a round-robin fashion. Each second, it will consider
tsdb_buffer_flush_batchbuffers, and inspect whether each inspected buffer should be flushed (either because oftsdb_buffer_age_maxortsdb_buffer_write_min). This option controls how many buffers are inspected each second. The higher the number, the greater the potential peak workload on the database. If this number is low, compared to the number of checks in the system, it can however take a long time for the database to actually discover that a buffer holds entries that are too old and should be flushed.Default value:
8
6.3.3. Network Connection Manager Options
socketio_bind_port(integer)-
This is the TCP port on which the Connection Manager will listen for incoming connections. The standard SysOrb port is 3241, and there should be no reason to change this. If you must use another port, make sure that you change the port number both in the server, the agents and the web interface configuration files.
Default value:
3241 socketio_max_connections(integer)-
This is the maximum number of concurrent connections the connection manager will accept. The number should be sufficiently low not to overload the server, and sufficiently high to allow service of both agents and user interface. Both agent and user interface connections are only active when needed, so this number can be less than the number of agents and active users on the SysOrb Monitoring System. If you are seeing many messages in the SysOrb Server log about connections being expired because high or low-water pressure, and your SysOrb Server can handle the higher load, you should raise this number.
Default value:
300 socketio_max_inflight(integer)-
This is the maximum number (in thousands) of check-in results the connection manager will accept holding in memory, before it starts refusing agent connections. The purpose of this limit, is to prevent "check-in storms" - a situation in which a large number of agents simultaneously check in a very large number of results, causing the server to slow down, in turn causing even more data to queue up. By limiting the number of results held in memory and asking the agents to "check back later", the server can limit the load and prevent the overload. If this number is set too low, you may see the server refusing agent checkins even though it is not too heavily loaded.
Default value:
10(thousands) socketio_agentconf_rate(integer)-
This option defines how often a single SysOrb agent may request configuration from the SysOrb server. It is given as a number of seconds. Under normal operation, an Agent will only request this information when re-started. If this limit is reached it usually points towards a problem with an agent restarting over and over. There should be no reason to increase this limit.
Default value:
600 socketio_agentconf_burst(integer)-
This option defines how often a single SysOrb agent may request configuration from the SysOrb server. When an agent has requested information this many times in a row, the above rate limit will be enforced.
Default value:
5 agent_package_path(directory)-
This option specifies the directory where the Network Connection Manager should look for packages for the agent autoupgrade. The directory is automatically scanned once in a while.
Default value (Unix): /var/sysorb/upgrade
Default value (NT/2000): install-dir\Upgrade
6.3.4. NetCheck Manager Options
netcheck_limit_children(integer)-
This is the number of simultaneous TCP-based NetChecks that can run at any given time. Checking mail-server or web-server response times, or the response time of any other TCP based service, will cause a check program to run. This number limits how many check programs can run at any given time. The default value should be sufficient for a very large number of NetCheck services, as most checks only run for a few milliseconds each. Setting this value too low will cause checks to be queued but not lost. Setting it too high will consume more system memory and possibly slow down the entire system thereby reducing the accuracy of the NetChecks. It is better to leave this value low than set it too high.
Note: Windows NT / 2000 has a hard limit of 30 children, and it is not recommended setting the value above 25.
Default value (Unix):
32Default value (NT/2000):
20 custom_netcheck_conf(filename)-
This option points to the configuration file for the custom NetChecks. An example of how such a file should be written can be seen in the custom_netcheck.conf.sample in the same directory as the main configuration file.
netcheck_ping_spacing(integer)-
This option defines the minimal spacing between ICMP ECHO REQUEST packets in microseconds, increase this if your network equipment drops ICMP packets because of buffer overruns.
Default value:
10000μs dns_cache_secs(integer)-
The maximal time SysOrb will cache the result of DNS lookups in seconds.
Default value:
86400s libssl(filename)-
In the event that the NetCheck engine cannot locate the SSL-library, the excact path to the library can be specified using the libssl option. If the libssl option is set, the NetCheck engine will only try to load the exact specified library. Otherwise it will try a list of possible names for the library, and use the first one that loads.
Default value:
not setNote: This option is not available on Windows, as the SSL library is distributed with the SysOrb Server package.
6.3.5. General SysOrb Server Options
working_directory(pathname)-
This is the directory that will be used as working directory by the server once it is running. It does not matter much what this is set to, if all other filenames use absolute paths (which they should). On UN*X systems and Linux this option lets you set the working directory to somewhere outside of e.g. /home thereby allowing you to unmount /home without shutting down the SysOrb Server. On Microsoft Windows NT / 2000 this option has no other effect than providing a base path for relative filenames.
Default value (Unix): /var/sysorb
Default value (NT/2000): install-dir
license_path(pathname)-
The SysOrb server will search this directory for the sysorb.lic license file.
Default value (most Unix'es): /etc/sysorb
Default value (NT/2000): install-dir\Config
variable_file(filename, Unix only)-
This file is used for storing various non-critical values. The sysorb user must have write access to this file.
NT note: This option does not exist on NT, because the information is stored in the sub-key Variables in the registry under SOServer.
Default value (most Unix'es): /var/sysorb/variables.server
resource_directory(pathname)-
The resource directory is the directory where pictures and css-files used for email-alerts and -reports are kept.
Default value (most Unix'es): /var/sysorb/resources
Default value (NT/2000): install-dir\Resources
upload_serverinfo(boolean)-
This option controls whether this SysOrb server should send important information about its health to Evalesco A/S. If enabled the SysOrb server will try uploading the information using the HTTP protocol.
Default value:
false allow_import_export(boolean)-
In order to export or import sensitive data like passwords and agent keys you need to enable this option. This option should _only_ be set to true during import or export. When enabled the system in vulnerable to password and agent key sniffing among other things..
Default value:
false max_scan_processes(integer)-
The maximum number of parallel jobs to run during AutoDiscovery.
Default value:
8 allowed_candidate_nodes(integer)-
When a sysorb agent checks in to the server, but is not already configured on the server, a candidate node is created. This candidate node can be viewed in the web interface and used to create a real node. This option allows you to limit the number of candidate nodes that can be on the server at one time. Futher agents will be rejected without notice.
Default value:
10 spare_keypool_size(integer)-
The SysOrb server will try to have this number of Diffie-Hellman prime/generator pairs precalculated for future agents checking in.
Only if you have many agents registering with the SysOrb server in quick succession will it make sense to increate this value.
Default value:
5 keypool_reuse(integer)-
The SysOrb server will use a Diffie-Hellman prime/generator pair for negotiating secret keys with this many agents before discarding it.
Only if you have many agents registering with the SysOrb server in quick succession will it make sense to increase this value.
Default value:
1 passive(boolean)-
If this option is enabled, the SysOrb server will perform no NetChecks, generate no reports, not do AutoDiscovery, or take any other action. It will still accept incoming connection from the web interface and from SysOrb agents. This option is mostly useful for recovery, if one has accidentally started an AutoDiscovery, SNMP scan or the like, that turns out to slow down or crash the SysOrb server.
Default value:
false
6.3.6. Alert Dispatcher Options
mail_server(hostname)-
This is the name of the mail-server (a server accepting SMTP connections, and willing to relay for the SysOrb Server). It should be set to the name of a local mail relay on your site.
Default value: localhost
mail_from(string)-
This is the domain name that will be used in the HELO mail_from SMTP negotiation with the mail server, when an alert is sent via e-mail.
Default value: localdomain
reply_mail_to(string)-
This is the e-mail address that will be put in the From: field of all e-mails sent by the SysOrb Server. It should be a valid e-mail address of the SysOrb Server administrator in the form of: user or user@host.
Default value: root@localhost.localdomain
alert_sms_subject(string)-
Setting this option to a value, will make all SMS's sent via email to SMS gateways have the same subject. This can be useful, if the email to SMS gateway requires that the email has identification in the subject.
Note: Even with this option set, it is still possible to override the subject individually by "Forcing" the subject on a specific path, through the web-interface.
alert_defer_at_boot(minutes)-
If the SysOrb Server has a lot of agents configured, it sometimes sends out premature alerts, for agent checkin etc. In order to prevent this, the alert_defer_at_boot can specify for how long in minutes the SysOrb Server will defer sending out alerts, when it is started.
Default value:
2 alert_retry_delay(seconds)-
If an alert transmission fails, this is the delay in seconds that the SysOrb Alert module will wait until it re-tries the transmission.
Default value:
30 alert_attempts(integer)-
This option specifies the maximum number of times the SysOrb Alert module will attempt the transmission of a single alert message.
Default value:
5 alert_to_incident_log(boolean)-
This option controls wether SysOrb will log alert path usage to the nodes incident log.
Default value:
false webinterface_url(string)-
This is the URL for the Web-interface that will be put in the alert messages, for the user to click on. It should point on the preferred Web-interface for the server.
Default value: http://localhost/sysorb
modem_port(filename)-
This is the name of the modem device on your system. On Unix-like platforms, please make sure that the sysorb user has both read and write access to the device pointed to by this option, as the server will otherwise be unable to use the modem.
Default value (Unix): /dev/modem
Default value (NT/2000): COM1
modem_options(string)-
This comma separated list specifies the capabilities of the attached modem. The possible elements are
- page
-
The modem is able to dial a numerical pager. (Any modem should have this capability).
- sms
-
Indicates that the modem supports the GSM 07.07 and GSM 07.05 standards.
Default value:
page modem_init(string)-
This string is sent to the modem before a number is dialed.
Default value:
ATE0 S7=20 S8=2 modem_sim_pin(string)-
If you use the Siemens M20 GSM box for sending SMS messages directly to your cellular phone, you must supply the PIN code for the SIM card here, if one is needed for the SIM card to work.
modem_baud_rate(integer)-
Use this option to set the baud-rate of the serial port SysOrb uses to communicator with the modem. The allowed values are 200, 300, 600, 1200, 2400, 3800, 9600, 19200, 38400.
Default value:
19200 modem_pager_timeout(seconds)-
Use this option to set the maximal time to elapse between the ATD and ATH commands, when SysOrb is dialing a numerical pager (or an analog phone.)
Default value:
30
6.3.7. SNMP Options
max_snmp_table_entries(integer)-
If SysOrb sees more that this number of entries in one SNMP table during a scan, the rest will be ignored.
You may increase this value if any of your SNMP devices has huge tables. Please note that the SysOrb web interface may navigate slowly in such cases.
Default value:
500
6.3.8. ServerCluster Options
max_transfer_unit(integer)-
This option sets the maximum transfer unit (mtu) for the network, which connects the servers in a cluster. The default value is 1500, which works for Ethernet, but if the servers are connected by another type of network, you might need to change this option. The allowed range is 500 to 1500.
Default value:
1500 host_name(hostname)-
In a ServerCluster each server tries to determine its index in their common list of members. If for some reason the name in the cluster_members list is not the same as the servers DNS name, the server will not be able to determine its own index. This option allows the administrator to manually tell the server what name to look for in the member list.
broadcast_bind_port(integer)-
This is the UDP port on which the broadcaster process will listen for incoming messages. The standard port is 3241, and there should be no reason to change this. If you use a different port, agents will no longer be able to find the server by means of broadcast discovery packets.
Default value:
3241 cluster_members(list of hosts)-
This option contains a list of names for all the hosts in the cluster. The list of hostnames must be separated by commas, and it must not contain whitespace characters. If the servers in the cluster are running on different ports, the port can be specified by adding a colon and the port number after the hostname (e.g. sysorbserver:1765). If no port number is given it defaults to
broadcast_bind_port. The order of the hosts must be identical on all the hosts in the cluster. If you do not want to use the clustering capabilities in SysOrb just insert localhost as the only cluster member.Default value: localhost
cluster_options(list of options)-
Currently SysOrb supports two cluster options:
-
slowmotion: This option slows all operations in the cluster. When the option is on there is a much higher output of debug information. Normally there should be no need for this option, as it will only slow down the system. -
no_timesync: This option disables the internal time synchronization system. Only use this option if you are having trouble with the time synchronization, and you are running NTP (or similar) on your servers.
Default value: (blank)
-
concurrent_check_recoveries(integer)-
When the servers in a cluster re-unite, they will attempt to concurrently merge the timeseries of this number of checks. If the interconnect between the servers of your SysOrb servercluster has high bandwidth and/or latency, then increasing this number may improve performance.
Default value:
4
6.3.9. Grid Options
ssec_keylength(bits)-
This SysOrb station (server or ServerCluster) will generate RSA station keys with this many bits.
Default value:
1024 ssec_min_keylength(bits)-
This SysOrb station will require RSA keys from other stations to be at least this many bits.
Default value:
1024 ssec_secret_keylength(bits)-
This SysOrb station will generate AES session keys with this many bits
Default value:
256 ssec_secret_min_keylength(bits)-
This SysOrb station will require AES session keys from other stations to be at least this many bits.
Default value:
128 ssec_secret_lifetime(seconds)-
Determines how often session keys should be replaced
Default value:
600 grid_default_ttl(integer)-
Default TTL for grid messages
Default value:
8 master_notify_queue(integer)-
The maximum number of pending updates that a SysOrb master will keep track of. If the satellite fails to acknowledge them, the master will kick the satellite.
Default value:
8192 satellite_tsdb_async(integer)-
The maximum number of timeseries being propagated from the satellite at one time
Default value:
32
6.4. Troubleshooting HTTPS/IMAPS/POP3S problems
The SysOrb Servers SSL support uses the OpenSSL libraries. On all platforms except Windows, it uses the version of OpenSSL that ships with the operating system. This chapter describes how to troubleshoot SSL check problems on the Unix-like platforms.
The most common problem is that the check shows "No Connection" even though the service is accessible. It usually happens because the OpenSSL library is not installed on the host OS. If this is the case, you will be seeing "No connection" errors in the SysOrb Web Interface, and the server log will contain the following message:
Could not load SSL-library. Please check the administrators guide for information
about how to fix this problem
The first thing to check is that the OpenSSL library is installed on the host OS. How to ensure this can be seen in the list below:
- Most Linux and FreeBSD
-
On the platforms that aren't mentioned below, the SysOrb Server package depends on the OpenSSL package being installed. So if the SysOrb Server package can be installed, the OpenSSL library is also installed.
- Mandrake/Mandriva
-
On Mandrake/Mandriva one of libopenssl0, libopenssl0.9.7 or libopenssl0.9.8 should be installed.
Please consult the Mandrake/Mandriva documentation for information about how to install one of these packages.
- Solaris
-
On solaris there are two options for providing OpenSSL. On Solaris 10, an OpenSSL library package is included in the operating system. This package is called SUNWopenssl-libraries. On Solaris 8 and 9 OpenSSL is not a part of the operating system. However an OpenSSL package can be downloaded from http://www.sunfreeware.com.
To check if one of these packages are installed you should execute the following commands:
pkginfo -l SUNWopenssl-libraries
pkginfo -l SMCossl
If one of these commands succeeds in printing out informaiton about the package, the OpenSSL library is installed.
If none of these packages are installed, you should install one of them. For Solaris 10, please consult the Solaris documentation for information about how to install the SUNWopenssl-libraries package. For Solaris 8 and 9, follow the instructions available from http://www.sunfreeware.com.
It is not necessary to restart the SysOrb Server, if the OpenSSL library was installed while the SysOrb Server was running.
If the OpenSSL library is installed, and SysOrb still cannot
find the OpenSSL library, you can specify the exact location of
libssl.so (or similar named), by using the libssl server configuration option. See Section 6.3.4 for information about this
option.
If you instead get a message stating
Error loading libraryor
Error dynamically loading functionit means that your version of OpenSSL is incompatible with SysOrb. In this case you should either upgrade to a newer version provided by your OS provider, or download the source code from http://openssl.org and compile it by hand. Instructions on how to do this can be found on the OpenSSL homepage. Note that after the installation, it might be necessary to use the
libssl to get the
SysOrb Server to use the correct version of openssl.Chapter 7. SysOrb Web Interface Configuration
The Web Interface needs to know how it can contact the SysOrb Server. Note that the Web Interface can run on any system with network access to the SysOrb Server system and that it does not have to actually run on the same physical machine, although this is by far the most common configuration.
The configuration of the SysOrb Web Interface is stored in /etc/sysorb/cgi.conf on all Unix-like systems, except FreeBSD where the file is stored in /usr/local/etc/sysorb/cgi.conf, and Mandrake where the file is located in /etc/opt/sysorb-server/cgi.conf. On Microsoft Windows configuration is performed by the SysOrb Config program found in the start menu.
7.1. General Web Interface Options
server_list(list of hosts)-
The list is a comma-separated list of hostnames, without whitespace. The web interface first tries all the hosts in the list, and then only displays those that answered. If the servers are running on different ports, this can also be specified by adding :portno after the hostname. If no portnumber is given the default is
server_port.Default value: localhost
server_port(integer)-
This is the port number on which the SysOrb Server listens for incoming connections. The value should only be changed if the server has been told to use another port number as well. It should not be necessary to change these port numbers, but it is nonetheless possible if needed.
Default value:
3241 default_domain(domain-identifier)-
This option specifies which domain should be presented in the domain box on the login page. If this option is unspecified it defaults to the empty string, which is also the root domain.
Default value:
.(dot)
Chapter 8. SysOrb Web Server Configuration
On Windows it is possible to install a Web Server with a small feature set, that is customized for use with the SysOrb Web Interface. It is provided as an alternative to installing IIS, but for the larger installations the use of IIS is still recommended, because if its larger featureset.
The SysOrb Web Server has few configuration options, and most should be set to reasonable values by the installation program.
8.1. Web Server Configuration Reference
The following sections list the available configuration options for the Web Server. Note that usually the Web Server is ready for use after the installation.
8.1.1. File Options
html_dir(directory)-
This option specifies the directory from which the static files should be served.
Default value: install-dir\www
cgi_dir(directory)-
This options specifies the directory from which the CGI-programs should be served.
Default value: install-dir\www
cgi_ext(file extension)-
The file extension used to determine if a request is for a CGI-program or for a file.
Default value: cgi
index_file(file name)-
The name of the file that should be served if no file is specified.
Default value: index.cgi
8.1.2. Logging
log_file(file name)-
The name of the file that the Web Server should log to.
Default value: install-dir\error.log
tick_time(seconds)-
How often the Web Server should write "MARK" messages to the log file. Use 0 to disable writing of MARK messages
Default value: 0
log_level(integer)-
The amount of logging that is written to the log file. Write 0, to disable logging, 3 to only log warning messages, 7 to log warning and informational messages, and 15 to log everything including debug messages.
Default value: 7
log_rotate_time(seconds)-
How often the log-file is rotated, in seconds.
Default value:604800 (7 days)
8.1.3. Server/network options
port(integer)-
Use this option to set the port number through which the Web Server should be available.
Default value:Determined during the installation
server_string(string)-
The server identification string. This string is sent whenever a page is requested from the Web Server. Change this option to make the SysOrb Web Server present itself differently.
Default value: SysOrb Httpd v.3.4.1 build 4278 on Windows NT (IA-32)
max_connections(integer)-
The maximum number of open connections to the Web Server. When this number of connections is reached, new connections will not be accepted.
Default value: 32
time_out(seconds)-
The number of seconds a connection is allowed to be idle, before the Web Server automatically closes it.
Default value: 60
Chapter 9. SysOrb Agent Configuration
The agent has few configuration options. It only needs to know about a few simple things, such as how to contact the SysOrb Server. The real configuration of what checks to perform, when to check in and so on is configured on the SysOrb Server, and migrated to the agent on demand.
The agent configuration is stored in the file /etc/sysorb/agent.conf on all Unix-like systems, except FreeBSD where it is stored in /usr/local/etc/sysorb/agent.conf, Mandrake where the file is located at /etc/opt/sysorb-agent/agent.conf, and Tru64 where the file is located at /usr/opt/AGT341/etc/agent.conf. On Microsoft Windows systems this information is stored in the system registry, and is made accessible through the SysOrb Config program installed with the SysOrb Agent.
The agent must be restarted in order to reread the configuration. However, reconfiguration of the agent options is almost never needed after the agent is set up the first time.
On Unix systems a hangup signal (SIGHUP) can be sent to the agent to re-open the log file. This is used by the logrotate script on Linux, and can be employed similarly on FreeBSD and Solaris. On Windows the log-rotation is handled by the agent.
9.1. Agent Configuration Reference
Most of the options in the SysOrb Agent configuration are specific to the site where the SysOrb runs and, as such, no appropriate default values can be given. When installing the SysOrb Agent remember to check that the configuration options matches the environment in which the SysOrb Agent works.
The first three options need to be changed on almost all new installations.
name(hostname)-
This is the name the agent will use to identify itself to the server. This must be the exact same name as a host created on the SysOrb Server.
domain(domain-identifier)-
This is the domain the agent uses to identify itself to the server with. This must be the exact same domain as the agent was configured with in the server.
server_list(list of hosts)-
This option specifies which server(s) the agent should checkin on. If more than one server is specified they must be listed in a comma-separated list. If the servers do not use the same port, it can be specified by adding
:portnoafter the hostname. If no portnumber is specified the default, given byserver_portis used.Note: Not necessary to specify all the names of the SysOrb Server machines that the agent can check into, when running a ServerCluster. The first time the agent connects to one of the servers in the cluster, it retrieves a list of all the machines that are currently members of the cluster, and this list takes precedence above the
server_listin the configuration file. So theserver_listonly need to specify one running SysOrb Server.
The following options rarely needs to be changed:
server_port(integer)-
The port number on which the SysOrb Server will be listening for incoming connections. This number should not be changed, unless there is some special reason for using another port.
Default value:
3241 logfile(filename)-
This is the name of the logfile the agent will use to write informational messages and errors in. You should keep the default setting unless you want to place the logfile somewhere else.
Default value (Unix): /var/log/sysorb/agent.log
Default value (NT/2000): install-dir\Config\agent.log
variable_file(filename, Unix only)-
This is the name of the variable file, which the agent uses to store non-critical values. The sysorb user must have write access to this file.
Windows note: This option does not exist for Windows, because all the information is stored in the registry.
Default value (Unix): /var/sysorb/variables.agent
log_level(0-3)-
This is the logging level to be used by the agent. The higher the number, the less the agent will log. The default is
1, where most uncommon messages are logged, as well as all errors. For troubleshooting purposes, you may wish to set the log level to0, where the agent will log a lot of routine events.Default value:
1 log_days(integer)-
This option tells the agent how many days should pass before it changes logfile. The old logfile will be renamed to logfile.X, where X is increasing as the files get older, and logfile is the value specified in the logfile parameter. If set to 0, the logfile is never changed by the agent.
Unix note: Many Unixes have a build in tool, which handles the change of logfiles. If your Unix does not have such a tool, you should enable log_days
Default value (NT/2000/NetWare):
7Default value (Unix):
0 max_log_files(integer)-
This option determines how many changed logfiles will be kept.
Default value (NT/2000/NetWare):
5Default value (Unix):
0 allow_autoupgrade(boolean)-
The agent will only attempt to download and install a new version of itself if this flag is set to true. See Chapter 5 for further explanation.
Default value:
true use_psapi(boolean, Windows only)-
Choose which way the SysOrb Agent retrieves the list of running processes. The default
falseuses the same way as the Windows Task Manager, and should work on all machines. However if you experience trouble with the process reporting, try switching this on.Warning: Changing this option will change the name of some of the running processes, since the two different way, also uses different naming. So when changing this option, the agent must be rescanned and it should be made certain that all the process presence checks still work.
Default value (NT/2000):
false perf_cnt_level(string, Windows only)-
This option changes the detail level of the performance counters reported to the SysOrb Server. There are four different levels:
Novice,Advanced,ExpertandWizard. Changing this from the default ofAdvancedwill change the number of performance counters that can be checked. TheNovicelevel will return the lowest number of performance counters, and theWizard-level will return the highest.Note: After this option has been changed, the agent must be rescanned from the Web-interface in order for the new performance counters to show up.
Default value (NT/2000):
Advanced max_data_retention_days(integer)-
If the agent is unable to contact the server, it will still generate monitoring data and save it. If the server is unavailable for a longer time, the agent can end up using large amounts of memory. Use this option to set how many days should pass without server connection before the agent starts discarding the monitoring data. Set to 0 or negative value to disable discarding of monitoring data.
Default value: 7
custom_chk_conf(filename)-
If this option is set, the agent will try to read the custom check configuration file specified by the option. For information about the custom check file format, see Section 9.3.
Default value: (none)
actions_conf(filename)-
If this option is set, the agent will try to read the custom AgentAction configuration file specified by the option. For information about the custom AgentAction file format, see Section 9.4.
Default value: (none)
log_chk_conf(filename)-
If this option is set, the agent will try to read the log check configuration file specified by the option. For information about the log check file format, see Section 9.5.
Default value: (none)
9.2. Releasing keys to force registering at SysOrb server
If you for some reason would like an agent to check-in to another server than the one it already does, you have to release the authentication key for the agent. Both the server and the agent has the key, which is used for security purposes.
9.2.1. Releasing on agent
To release the agent key on a Unix-like system, you must delete you the variables file while the SysOrb agent daemon is stopped. The location of the variables file is configured in the agent.conf file on the host where the agent runs (ususally /var/sysorb/variables.agent).
To release the key on a windows open the SysOrb configuration utility located in Start menu->Programs->SysOrb->SysOrb configuration. In the configuration tree choose SysOrb agent->General->Release Key. In the dialog on the right side of the configuration dialog click the Release Key button.
To release the agent key on a NetWare system, you must delete you the variables file while the SysOrb agent NLM is unloaded. The location of the variables file is configured in the AGENT.CFG file on the host where the agent runs (ususally \SYSORB\AGENT.VAR).
9.2.2. Releasing on server
You can also release the key on the server to force the server and agent to make a new key.
To release the key on server, do the following in the SysOrb web interface:
-
Click the button in the navigation menu.
-
Find the host you want to have release the key for in the configuration tree.
-
Click edit on the edit link associated with the host.
-
Select .
-
If the server and agent has negotiated a key you will be able to find a Agent key label. Click on the on the right to release the key on the server. If the label is not present, it is because the server does not have a key for the host in question.
9.3. Configuration of custom checks
If the built-in checks of the SysOrb Agent does not suffice for you particular setup, you may write extension scripts that can perform the check.
You can write these scripts in any language you desire. The only requirement is that the script must deliver the result of the check to the SysOrb Agent in one of two ways.
-
If the check is either good or bad, the script must tell the SysOrb agent by the exit code. A non-zero exit code indicates a bad result, while an exit code of zero indicates a good result. How exit with specific exit codes depends on the script language used.
-
If the check can return a numeric value within some range, it must output that value decimally to standard output on a line like: "Result: 1234". Note that the colon must be present, and that the Agent is case sensitive. The SysOrb Agent will parse the output from the script, putting any line not conforming to the above format into the agent log file.
The custom checks that an Agent is able to execute is configured using a file on the machine running the SysOrb Agent. It may have been more convenient to be able to do it from the web interface, but that would open serious security risks, as any SysOrb user, with capabilities to configure checks, would be able to have the agent execute arbitrary shell commands.
In order to use custom checks you must first tell the SysOrb Agent where to find the custom check configuration file. On non-windows systems this is done by adding a line like
custom_chk_conf=/etc/sysorb/custom.conf
to the agent configuration file (usually located in /etc/sysorb/agent.conf). On Windows you must open the SysOrb Configuration utility located in Start menu->Programs->SysOrb->SysOrb Configuration. In the configuration tree choose SysOrb Agent->Configuration files->Custom checks and enter the path where you are going to put the new configuration file.
After changing this path, the Agent must be restarted, but wait until you have put something into the new file.
You must edit the new file custom.conf in order to configure which custom checks the agent can perform. The format of the file is most easily illustrated with a few examples of custom checks:
Example 9-1. Good/bad check
# Comment lines begin with #
[check name]
command=/path/to/the/execfile parameters
timeout=10
The value between [ and ] gives the name of the check. command is the command sent to the shell, so normal shell expansion works. The timeout parameter is optional, and the default value is 10 seconds. Please note that the SysOrb Agent stops processing other tasks (ordinary checks and communication with the server) while a custom check is carried out, so timeout shouldn't be more than half of the checkin frequency for that agent.
Example 9-2. Numeric integer check
[check name]
type=integer
unit=kB
command=/path/to/the/execfile parameters
timeout=10
The line type=integer tells the SysOrb Agent, that this is a numeric integer check, that will output a line on the form Result: 1234, the unit property tells the agent, that the numeric output should be interpreted as a number of kilobytes. This information is passed along to the SysOrb Server, to allow putting units on the Y-axis in graphs and elsewhere.
Example 9-3. Numeric real check
[check name]
type=real
unit=s
command=/path/to/the/execfile parameters
timeout=10
The line type=real tells the SysOrb Agent, that this is a numeric check, that will output a line on the form Result: 12.03, the unit property tells the agent, that the numeric output should be interpreted as a number of kilobytes. This information is passed along to the SysOrb Server, to allow putting units on the Y-axis in graphs and elsewhere.
Example 9-4. Differential numeric integer check
[check name]
type=diff_integer
unit=kB/s
command=/path/to/the/execfile parameters
timeout=10
The line type=diff_integer tells the SysOrb Agent, that this script outputs an integer like a numeric integer check. For each pair of successive invocations, the SysOrb agent will subtract the two results, and divide the difference with the elapsed time. This is useful if your script for instance outputs the number of bytes which have passed through an interface since some fixed point in time, but you want the check to show the number of bytes per second passing through right now.
Example 9-5. Differential numeric real check
[check name]
type=diff_integer
unit=kB/s
command=/path/to/the/execfile parameters
timeout=10
The line type=diff_real tells the SysOrb Agent, that this script outputs an real like a numeric real check. For each pair of successive invocations, the SysOrb agent will subtract the two results, and divide the difference with the elapsed time. This is useful if your script for instance outputs the number of bytes which have passed through an interface since some fixed point in time, but you want the check to show the number of bytes per second passing through right now.
Whenever you edit this file, you must push open a web interface and push on the tab on the Configure page for the host in question. You do not need to restart the SysOrb Agent, unless you have changed the location of this file.
Sometimes you do not write the script yourself, and there is no easy way of having it output its result on a line like Result: 1234. In that case you can instruct the SysOrb Agent to look for the result in lines containing other text. You do that by means of a POSIX regular expression. The syntax of regular expression can be found at: http://www.opengroup.org/onlinepubs/007908799/xbd/re.html
Example 9-6. Script outputting Response time: 1234 ms
[resp_time]
type=integer
command=measure-command
result_pattern=^Response time: ([[:digit:]]+) ms$
timeout=10
The result_pattern must contain exactly one set of parentheses enclosing the pattern matching the numerical result of the check.
Example 9-7. Count the number of files in /tmp
[temp_count]
type=integer
command=find /tmp -maxdepth 1 | wc -l
result_pattern=([[:digit:]]+)
timeout=10
This result_pattern will match any line containing numerical characters. The SysOrb Agent will then pick the first line containing numbers, and if there are more than one number on that line, the leftmost of them.
9.4. Configuration of AgentActions
Starting with SysOrb version 2.4, you can now define AgentActions, which is actions carried out on the Agent machine, when a user orders this through the Web Interface. These actions can help ease remote administration, as they can be defined to carry out common tasks on machines. An AgentAction could as an example restart a webserver, or reboot the target machine.
In order to use AgentActions you will first have to configure the Agent to read the actions from a configuration file. The name of this file is specified through the actions_conf option in the agent configuration (see Section 9.1 for information about how this is done).
The fileformat for the AgentAction configuration file resembles the fileformat of the Custom Check configuration file very much. The format consists of a block as following for each action:
# Comment lines begin with #
[action name]
execfile=/path/to/the/execfile parameters
The action name between the [ and ] is the name displayed to the user of the Web Interface. The execfile parameter is the command which is executed. On Unix-like systems this command is passed to the shell, so normal shell syntax can be used.
As an example, the following configuration file will create an action that will restart IIS on a Windows 2000 Server installation.
Once the AgentAction configuration file is in place, you must rescan the agent before the actions appear in the Web Interface. When they appear, they will be accessible from the Node overview page, and from the AgentCheck configuration pages.
9.5. Configuration of LogChecks
The SysOrb Agent can scan logfiles on the host machine, and report any error messages or unexpected event to the SysOrb Server, providing a quick overview of all machines on your network.
The files that the Agent can monitor this way must be specified in a configuration file on the machine running the SysOrb Agent. This is a safety measure, guarding agaist a compromised SysOrb Server being able to retrieve a copy of any file on the hosts running SysOrb Agents.
The name of the file containing the definitions of the allowed
LogChecks is given in the Agent configuration option log_chk_conf (see Chapter
9 for more information). It is usually called log.conf, a sample file allowing a few system log
files to be scanned is included in the SysOrb Agent package.
The file contains a number of lines that each specifies a path that is to be searched for log files to monitor. This can be a specific file path, such as C:\logs\error.log or /var/log/messages. But it can also contain the following special wildcard characters. '?' can match any character. '*' matches any character string of any length. '**' matches any directory path. Thus, the path C:\logs\log??\**\error.log matches C:\logs\log01\sub\dir\error.log and C:\logs\log02\sub\sub\dir\error.log, but not C:\logs\log002\sub\dir\error.log.
You can also specify to scan for eventlogs by setting the path o 'eventlog:*'. This will scan for all eventlogs available, but you can replace '*' with a specific event log name.
Note that for these logs to actually be monitored, you will have to configure them on the SysOrb server, setting up how often the check should be performed, along with various other parameters. (See the User's Guide for information on how to activate LogChecks.)
9.6. Enabling IPMI hardware monitoring
The agent supports monitoring of hardware parameters such as fan speeds, temperatures, voltages etc. by means of the IPMI (Intelligent Platform Management Interface) standard on supported server and operating system combinations.
Hardware monitoring with IPMI is supported on these operating systems:
- Windows Server systems prior to Windows 2003 R2
-
Intel provides an IPMI driver free of charge which can be used on these systems. The driver can be downloaded from the Intel driver download page. This driver is fully supported by the SysOrb Agent.
- Windows Server 2003 R2 (and later)
-
Microsoft provides an IPMI driver as part of the operating system. It is no installed by default, but can be installed by following the instructions from the TechNet article "Enabling Hardware Management". This driver is fully supported by the SysOrb Agent.
- Linux kernel 2.6 based systems
-
Most modern Linux distributions ship with Linux kernels from the 2.6 series, and include an OpenIPMI driver. This driver is fully supported by the SysOrb Agent.
Chapter 10. Grid configuration
10.1. Grid overview
The SysOrb Grid functionality allows for centralized secure monitoring of remote networks. A "satellite" can be installed on a remote network, and perform NetChecks, SNMPChecks and receive Agent Check-ins on that remote LAN. The satellite can securely deliver all locally gathered check results back to a "master", the single centralized SysOrb Server.
A grid will contain one master, and one or more satellites. These are collectively called "Stations" in the grid. It must be possible, network wise, for either the master to initiate a TCP connection to the satellite, or, for the satellite to initiate a TCP connection to the master. Therefore, it is actually possible to monitor multiple LANs sharing the same IP ranges (for example the 10.0.1.X series), as long as the satellites can connect to the master.
If the network connectivity between a satellite and the master fails, the satellite will continue to run all configured checks on its local network. It will hold all measurements gathered in its local database, until the network connectivity comes back up. The satellite does not hold measurement data locally for any longer than what is necessary - but since it does include the full featured database already used in the common SysOrb Server product, it can spool measurement data to disk efficiently for very long periods of time, if the network outage is prolonged.
The high levels of security in the grid networking layer, combined with the autonomy of the grid satellites, allows the use of satellites for running SNMPChecks and NetChecks on remote locations, securely on the LAN, and reporting back these results in a safe manner to a central SysOrb Server (a Grid Master). Even though a VPN could also be used to secure the otherwise inherently insecure SNMPChecks and NetChecks, a VPN would not allow for continued monitoring in case of network outages, and the VPN itself would incur a significant and unpredictable latency to the checks. In other words, the grid solution with satellites allow for consolidated monitoring scenarios that are not possible to achieve using other conventional technologies, as, for example, VPNs.
10.1.1. Grid IDs - the GID
As mentioned, the IP addresses of satellites need not be unique across your SysOrb installation, and therefore cannot be used to uniquely identify a satellite in the grid. When configuring NetChecks and SNMPChecks it is possible to specify which station should execute the check - in order to accommodate this, there must be some form of unique identification of every single station in the grid.
A "Grid ID" scheme has been developed for this purpose. Grid IDs, or GIDs, are unique numbers used to identify a station in the grid. A GID consists of four two-digit hexadecimal numbers; for example "0A:3D:42:F1".
In order to accommodate future grid interoperability between existing installations, it is highly desirable that all SysOrb installations use globally unique GIDs. This is not a requirement as such, and any installation is free to use whatever GIDs it wants to - but Evalesco A/S encourages our users to use globally unique GIDs. In order to facilitate such a global numbering scheme, it is now possible for every customer to allocate a "GID Prefix" on the Evalesco Web site. The prefix consists of the first three numbers of the four-number GID. This prefix is guaranteed to be globally unique. Once the GID prefix is acquired, the user can freely assign the last of the four numbers - this allows for a grid with 256 stations (using numbers from 00 to FF), which should be enough for most installations. If more stations are required in a grid, more prefixes can be allocated for that customer.
If a prefix of "02:FE:C7" is assigned to a customer, that customer can use, for example, "02:FE:C7:01" as the GID for the master station, "02:FE:C7:02" as the GID for the first satellite, and so forth...
10.1.2. Links
In order to receive configuration from the master, and in order to report results back to the master, the satellite must have some form of network connectivity to the master. In SysOrb Grid terminology, we call this connectivity a "link". A link is a network connection between a single master and a single satellite.
Links can be initiated from the master, or from the satellite, or can be configured to be initiated from any of the two. A link will actually be constituted by a TCP connection from a random port on the initiator machine to the common port 3241 on the receiver machine. If you have configured your SysOrb Server to use a port other than the default 3241, you will of course need to adjust your link configurations accordingly.
The most common setup, is to configure the links so that it is the satellites (which are often on closed networks, often using the same 10.X.X.X IP address ranges) initiate the connection to the master (which is usually located on a public IP address). The connections initiated from the satellites can be NAT'ed out thru a firewall, for example.
10.1.3. Endpoint security
A grid will commonly consist of machines located far away from each other, with links going over common insecure Internet lines. The grid networking layer will ensure authenticity, integrity and secrecy of all communication within the grid. It is therefore not necessary to employ VPN solutions or private protected lines connecting the stations within the grid.
Every station in the grid will have its own RSA public and private key pair. This key pair is automatically generated when a station is first set up, and it can be viewed in the web interface (under "System Setup" and "This Station"). The RSA key pair will by default be 1024 bits, but this can be configured freely between 512 bits and 8192 bits.
The first time two stations establish a link between them, they will exchange their public keys. This communication cannot be authenticated, as the stations share no secrets prior to this exchange. A "man-in-the-middle" attack is thus possible during this initial exchange. It is therefore advised that one verifies that the public key received from a remote station is in fact the correct public key, by comparing the remote station key (found in the web interface under "System Setup" and "Stations", selecting the given remote station) as received on the local station, with the actual station key of the remote station (found as described above, on the remote stations web interface, under "This Station").
Once it is established that the public keys have been correctly exchanged during this very first connection of the stations, security will be maintained in all future communication.
Based on the RSA keys exchanged, the stations will negotiate a symmetric key for all following communication. This symmetric key establishment is referred to as "Endpoint Security" - it is the guarantee for authenticity, integrity and secrecy of all communication between the pair of stations. Per default, the endpoint security will consist of a shared 256 bit AES key. It is possible to configure stations to use 128 or 192 bit keys instead.
10.2. Configuring the Master
Your grid master will be the station on which all day-to-day operations happen. It is the station that will send out alerts, and it is the station that will store all historical data for every check running on the grid. Except for the initial satellite setup, all configuration of every monitored node in your grid will also be done via. the web interface on the grid master.
10.2.1. Installation and licensing
The grid master functionality is included in the standard SysOrb Server. Therefore, installing a grid master is simply the installation of a normal SysOrb Server, as described earlier in this manual.
The grid master functionality is enabled in the server with a special license file. Trial licenses are offered specially, and full licenses can be purchased just like the non-grid licenses. Please contact your sales representative or Evalesco A/S for details.
10.2.2. Configuring the master station
In the web interface, under "System Setup", enter the "This Station" page. Here you can specify a descriptive name for the station (the master), and you can enter the unique GID. Please use your allocated GID prefix, and pick the last number in the GID as you wish (as long as it is unique within your installation).
Once a descriptive name and the proper GID is entered, the station as such is configured to participate in your grid. The cryptographic keys on the configuration page will be blank initially, but once you have configured the station, the system will begin to generate a proper RSA key pair. After a few minutes (depending on the speed of the system), you should be able to see the signature and encryption keys listed in the web interface.
10.2.3. Adding a satellite to the master's configuration
The master must now be made aware of a satellite. We have not yet configured the satellite itself, but we can still let the master know that one is going to exist in the future.
Under "System Setup", please select the "Stations" page. This is for configuring all remote stations, as seen from this local station. Select "Add station" to add a satellite.
The "name" field cannot be filled out, as the name of the remote station will be fetched automatically once the master and the satellite establish their connection. The GID field, however, must be filled out. This field must contain the GID of the station you will be adding. Again, please make sure that you select a unique GID for your station, preferably using your allocated GID prefix.
10.2.4. Configuring the link between the master and the satellite
In order to facilitate communication between the master and the server, we must now let the master know how it can contact, or how it can be contacted by, the satellite. This is done under "System Configuration" and the "Links" page.
Select "Add Link" to define a link between the master and the satellite. You can enter a descriptive name for this link. You must now select whether the master may accept incoming connections from the remote station over this link, and whether the master may attempt to initiate connections to the remote station over the link.
For masters, it is most common to specify that they are allowed to accept incoming connections. Masters will often not be able to connect directly to the remote satellites, as these will often be NAT'ed away behind firewalls on remote networks. If, however, your master must attempt to establish the connection to the satellite, you must specify a destination IP address (and optionally a port number if your satellite deviates from the default configuration of using port 3241).
Now, that we have configured the master, made the master aware of the satellite, and configured the master's connectivity to the satellite, all of the grid specific communication is actually complete. We can now go ahead and actually configure the satellite station that we have just made the master aware of.
10.2.5. Exporting domains to the satellite
Information can be exported to the master, on a domain-tree basis. For each domain, one can specify a list of GIDs that are allowed to "mount" said domain. A common scenario is to create a domain for each remote satellite location, and specify the corresponding satellite GID in the allowed export list for the given domain.
Please create a domain for your remote satellite location (under "Configure", select "Add domain", and add a new domain as usual). For the rest of this example, let us assume the domain is called "remote" and that it is located right under the root domain. Please be sure to specify the GID of the satellite in the export list for the domain.
The satellite will now be allowed to retrieve all node and check configurations from the domain and from all domains under this domain. The satellite will still have to be configured to actually "pull" this information from the master, but specifying the GID of the satellite in the export list of the domain is a prerequisite to actually allowing the export of information to the given satellite.
10.3. Configuring the Satellite
Configuring the satellite is very similar to configuring the master. You must perform a number of steps here using the web interface on the satellite system. However, there will be no use for the web interface once the satellite is configured. It would therefore be wise to un-install or disable the web interface on the satellite once the configuration is done. Please also note that the satellite will have its own administrator user, with the default "admin" login name and default password. The password on this account should be changed to prevent others from reconfiguring the satellite station!
10.3.1. Installation and licensing
Grid Satellite functionality is also included in the standard SysOrb Server packages. The satellite functionality is enabled, like in the case of the master, with a special license file.
10.3.2. Configuring the satellite station
Like we configured the master for its participation in the grid, with a descriptive name and a unique GID, we must now configure the satellite with its parameters for grid operation.
In the web interface, under "System Setup", enter the "This Station" page. Here you can specify a descriptive name for the station (the satellite), and you can enter the unique GID. Please make sure that you use the same GID as you did when you configured this satellite previously on the master station.
10.3.3. Adding the master to the satellite's configuration
As we told the master about this satellite, we must also tell this satellite about the existence of the master. Under "System Setup", please select the "Stations" page. Select "Add station" to add the master.
The GID field must contain the GID of the station you are adding - this should be the GID of the master station.
10.3.4. Configuring the link between the satellite and the master
We have already specified on the master, how communication should commence between the satellite and the master. We must now tell the satellite how this happens as well - keeping in mind that from the satellites point of view, this will be a "reversed" configuration compared to the master. For example, if the master must only accept connections and never initiate, the satellite must be told to initiate and never accept. Like on the master, the link configuration is performed under "System Configuration" and the "Links" page.
Select "Add Link" to define a link between the satellite and the master. You can enter a descriptive name for this link. Now, enter the "reversed" configuration of what was done on the master side. Assuming the master was configured to accept and never initiate connections, you must now specify the opposite for the satellites link configuration, and you must supply an IP address for the satellite to connect to.
The satellite will expect, that when it connects to the IP address that you specify, it will find a station with the GID that you specify for this link. Please be sure that the satellite is actually allowed to initiate a TCP connection to the given port on the given IP address, and that this actually is the proper IP address of your master station.
10.3.5. Mounting domains from the master
Earlier, a domain called "remote" was created on the master station, and the GID of this satellite was added to the domain export list. We can now tell the satellite to actually mount this domain - to retrieve all configuration information under the domain, store it in the local database, and to perform any checks that might be configured on nodes under that domain.
Under "Configure", select "Add Mountpoint". Now select the GID of the master to import information from. Also specify a descriptive name for the mount - this name does not have to be the same as the name of the domain on the master. Finally, you must specify the actual domain, as named on the master, to mount. Using the example "remote" domain, you can specify ".remote" in this field, to state that you wish to import the domain named "remote" located directly under the root domain on the master.
Domains are separated with dots. If, for example, the satellite should mount a domain called "foo", under the domain "bar", under the root domain, the path would be ".bar.foo".
As soon as the satellite and the master establish their link and negotiate their end-point security, the satellite will attempt to retrieve all configuration information for the configured mountpoint. All of this is happening as background operations, and you will not actually have to wait for any of these operations to complete. You can follow the progress of the link establishment, the security negotiations, and the actual database synchronization happening in the mount process, by using the logs under the "Stations" and "Links" pages under "System Setup" on both the satellite and the master stations.
This concludes all "system level" configuration of your master and satellite setup. All remaining configuration will be done via. the web interface on the master system exclusively. The satellite will be notified by the master of any configuration changes, and will automatically start performing any checks that are configured to be run on the satellite.
10.4. Getting started with remote monitoring
You can specify, either on a check-by-check basis, per node, or per domain, from which grid GID SNMPChecks and NetChecks should be performed. In order to get started with your satellite quickly, we suggest that you enter the configuration page for the exported domain, using the web interface on your master station, and specify that all checks should be performed on the GID of the satellite. Enter "Configure" and "Edit" for the exported domain, in order to do this.
Now, you can run an "Auto discovery" under the exported domain. This will start an auto-discovery process on the remote satellite, and the satellite will then configure any nodes that it discover on the remote network. These nodes will appear as they are found, in the web interface on the master.
From here on, you can add new checks, re-configure the ones already set up, add or delete nodes, etc. etc. All reconfiguration that you perform via. the web interface on the master, will be propagated to the relevant remote satellites. The satellites will report back check results to the master, where you can access the graphs and where alerts can be generated. In fact, as soon as the grid is configured, the day to day administration is very similar to the common setup with only one SysOrb Server, except that you now have the ability to run NetChecks and SNMPChecks efficiently and securely on remote locations.
Chapter 11. SysOrb Server maintenance
11.1. Adding MIB files
In order to monitor nodes using snmpChecks the SysOrb server must know about the name, measuring scale etc. of the parameters to be monitored. These informations is stored in MIB (Management Information Base) files.
SysOrb comes with a number of MIB's pre-installed. These MIB's cover standard parameters such as traffic statistics for routers and switches, and some common printer parameters. You should be able to set up basic monitoring of almost any SNMP enabled router, switch or printer without adding other MIB files.
Should you, however, wish to monitor vendor-specific parameters on your network equipment, you will need to add the relevant MIB files to the ones already in SysOrb. This is done while the SysOrb server is running and operational.
To add a MIB file named xyz.mib to a running SysOrb server, execute the command sysorb-mibparser -l admin xyz.mib, assuming a SysOrb user named admin exists in the root domain, and has appropriate privileges. The sysorb-mibparser utility will then extract the information from the MIB file and insert them into the running SysOrb database. Afterwards SysOrb does not need the file xyz.mib any more.
After adding the needed MIB files, you must perform a SNMP scan (again) of the nodes supporting any of the newly added parameters. You do that through the SysOrb web interface by clicking configure, browsing to find the node, clicking snmpChecks and finally clicking on the rescan button at the bottom of the page.
The full syntax of sysorb-mibparser is:
sysorb-mibparser [-h] [-s server] [-p port] -l login [-P password] mib-file...
- -s server
-
Instructs the utility which SysOrb server to connect to. Defaults to the local machine.
- -p port
-
If you SysOrb server uses a non-default port, use this switch.
- -l login
-
You must give the name of a SysOrb user from the root domain having appropriate privileges.
- -P password
-
You may specify a password on the command line to avoid having to type it afterwards, this is especially useful in scripts. However, you should mind the security implications of leaving a plaintext password in a script file.
- -h
-
Show a help message explaining the command line and switches.
11.2. Custom NetChecks
In some cases the NetCheck capabilities of the SysOrb Server is not good enough to satisfy a specific need. In these cases a Custom NetCheck can be created.
A Custom NetCheck functions the same way as a normal NetCheck. That is, the result from a Custom NetCheck is the amount of time it took to perform the check. They can of course be used for other purposes, but a Custom NetCheck always returns a number as its result.
This number must be an integer, and represents the number of milliseconds it took to perform the check, and must be written to output by the Custom NetCheck, in order for SysOrb to find it. The format of the line containing this number, can be specified for each check.
If SysOrb did not locate this line in the output from the Custom NetCheck before it exits, the check is marked as giving no reply. If the check does not write the line, in ten seconds, plus the upper limit for the check, the check will be marked as timed out.
The Custom NetCheck is executed as stated in the configuration, with the name of the node to perform the check on, given as the first parameter.
11.2.1. Configuring Custom NetChecks
In order to use Custom NetChecks, you must first tell the SysOrb Server where to find the Custom NetCheck configuration file. On non-windows systems this is done by adding a line like
custom_netcheck_conf = "/etc/sysorb/custom_netcheck.conf"
to the SysOrb Server configuration file (usually located in /etc/sysorb/server.conf). On Windows you must open the SysOrb Configuration utility located in Start menu->Programs->SysOrb->SysOrb configuration. In the configuration tree choose SysOrb Server->NetCheck Manager->Custom NetChecks, and enter the path where you are going to put the new configuration file.
The format of the Custom NetCheck configuration file is easily illustrated by a simple example:
Example 11-1. Custom NetCheck
# Comment lines start with a #
[NetCheck Name]
command=command to execute
result_pattern=([[:digit:]]+)
The value enclosed in [ and ] are the name of the Custom NetCheck, as it will be displayed in the Web-interface. The command, is the command to execute, in order to perform the check. The result_pattern is a regular expression, that tells SysOrb how to retrieve the result from the check. See Section 9.3 for more information about regular expressions.
Once the Custom NetCheck has been configured, the SysOrb Server must be restarted, in order for it to discover the new checks.
11.3. Custom AlertPaths
In addition to the built-in ways, that the SysOrb server can alert its users (Email, SMS, paging), you can also have SysOrb execute a script of your choice. This could be used to send SMS through a gateway of your provider, to put events into your help-desk system, to send an instant message, or whatever you can do through any command line utility.
The SysOrb server passes information about the alert to be sent exclusively through environment variables. Before instructing SysOrb to invoke the script, you probably want to debug it by running it on the command line with the environment variables manually set. You will find a list with descriptions of each of the variables at the end of this section.
In order to be able to set up the script to be invoked by SysOrb, you must have a running SysOrb server. Log into the web interface using an administrator account, and click the button. Then select and click . All you have to supply is a name of your choice for this type of custom alerts, and the command for running the script.
After registering the script with SysOrb. You can select any user, click , and the you should see a new option called . Try creating a path, and testing it by clickng next to the new path on the list.
11.3.1. Script environment
Here is the list of the environment variables passed to the custom alert script.
- SO_TYPE
-
This variable contains one of the the following values:
warning The script should send a warning alert The script should send an alert test The script should test the alert path scheduled_downtime The script should send a message, stating that the check is entering unexpected downtime. - SO_USER_NAME
-
The name of the user to receive this alert.
- SO_USER_DOMAIN
-
The dot separated name of the domain to which the user belongs.
- SO_DESTINATION
-
The alert path destination, as entered in the web interface, when the user created his AlertPath, that is using this script. If your script sends SMS'es through some in-house gateway, then you probably want the destination field to contain the phone number of the phone. Other scripts may require other information in the destinarion field, some may not need it at all.
- SO_NODE_LABEL
-
The full name of the Node in question, as shown on the overview pages.
- SO_NODE_DNS
-
The text from the dns-name/ip-address field of the node in question.
- SO_CHECK_TYPE
-
This variable contains one of the the following values:
checkin This alert is due to late checkin of the Node, and the rest of the SO_CHECK_... variables are not set, as this message concerns no specific check. netchecks This alert is due to a NetCheck. agentchecks This alert is due to an AgentCheck. snmpchecks This alert is due to a snmpCheck. - SO_CHECK_ACCUMULATION
-
Depending on whether this check is an accumulation or not, this variable will contain yes or no
- SO_CHECK_LABEL
-
A descriptive name of the check in question.
- SO_CHECK_NAME
-
A dot separated string, which identifies the Check relative to its Node. This is not suitable for inclusion in text presented to the user, use SO_CHECK_LABEL for that. Instead this is mostly useful for conditions in the script, if you for instance want to treat all ICMP checks different than other NetChecks.
- SO_CHECK_URL
-
A http url linking to the SysOrb web interface page for this check.
- SO_CHECK_INFO_URL
-
An optional http url given by the SysOrb user with additional information about this check.
- SO_RESULT_STR
-
The last measured value from the check, printed in human readable format, e.g. 2.34 MB.
- SO_RESULT_UNIT
-
The unit of the measurement of this check, e.g. B (bytes).
- SO_RESULT_VALUE
-
The last measured value from the check, measured in units given by SO_RESULT_UNIT, e.g. 2453666.00
- SO_ALERT_IF_ABOVE, WARN_IF_ABOVE, WARN_IF_BELOW, ALERT_IF_BELOW
-
The warn/alert limits, measured in units given by SO_RESULT_UNIT. If any of the limits are disabled, the corresponding variable will be unset.
11.4. Creating a new database
One can re-create a clean SysOrb database using the sysorb-createdb tool. This is required if one wishes to change the database block sizes, or if one wishes to run the database on raw disk devices (or partitions) rather than on a file system (on operating systems where this functionality is available).
The database creation tool will create two or three files, depending on chosen options. The files are:
- main.odb:
-
The meta database.
- main.odbj: (optional)
-
External journal for main.odb.
- main.tsdb:
-
The time series database
The tool accepts a number of command line options, described blow:
- -h:
-
Print a short help message summarizing usage.
- -i:
-
Start the tool in "interactive" mode - this will allow for a more fine grained control over the created database. It is not usually necessary to tweak these settings, and setting them wrong can result in a non-functional database. Use this option with care.
- -d path:
-
Specify a path in where the database files will be created. The default is to create the files in the current working directory.
- -c:
-
Create a completely empty database. This option is not generally useful in non-clustered configurations, as the database will not include the default administrative user, and thus it will not be possible to log into a server started with the empty database.
- -f
-
Force - no questions will be asked by the tool.
A number of advanced settings can be specified in the "interactive" mode of the createdb tool. When using the tool in the standard non-interactive mode, good defaults are chosen. It should not usually be necessary for an administrator to specify these options manually, but there are certain situations where such flexibility is useful.
Most notably, when creating a database on "raw" devices (partitions or volumes, rather than in files on a file system), it is necessary to use the interactive mode in order to specify the individual device locations (as the database needs two or three locations, and if volumes or partitions are used, two or three distinct locations must be specified).
In interactive mode, the user will be prompted for each of the advanced settings in turn:
-
Journal type: The meta database can use either an internal or an external journal. An external journal allows the administrator to place the journal on a smaller but faster storage device.
-
Journal size: A too small journal will, sooner or later, cause the SysOrb Server to perform an emergency shutdown. It is absolutely vital, that the journal is not chosen too small. The default journal size is 8 Megabytes, which is sufficient. If the journal can be placed on a very fast storage device, it may be beneficial to raise the journal size somewhat. It is not possible to give hard numbers for this though - a busy metadatabase with the journal on a fast storage device, may see speed improvements from a 16 Megabyte journal. It is generally recommended to just go with the default size of 8 Megabytes though.
-
Number of chains: The time series database relies on "phase chains" rather than a journal to guarantee consistency over unexpected system shutdowns. A number of chains is allocated - the database needs at least one chain as the "consistent" chain, and one as the "active" chain. Thus, the number of chains can not be set lower than two. Setting the number of chains higher does in theory not improve reliability - it does however give the operating system and hardware some amount of "slack" - the default is three chains.
-
Block size: A uniform block size is used in both the time series database and the meta database. Meta data objects cannot span blocks in the database, therefore the block size must be large enough for the largest possible object. It is not recommended to set the block size lower than 4 kilobytes, although a minimum of 1 kilobyte is possible using the createdb tool. Both databases use 32-bit block indexing, and are therefore limited in size to approximately four billion blocks. A block size of 8 kilobytes thus results in a maximum database size (for each of the metadata and time series databases) of 32 terabytes. Increasing the block size further will raise this limit. The default block size is 8 kilobytes.
-
Estimated number of checks: As a convenience, the createdb tool can - upon database creation - allocate space in the time series database for some given number of checks. This is only an initial allocation, and the database will be grown later as needed. The default of 1000 checks will result in a database of approximately one gigabyte in size. For small installations, use a smaller number. Again, the database will be grown as needed, anyone can put "10" here - which will make the creatdb run significantly faster.
The following will create a standard database with the default "admin" (password: "admtest") login in the directory /mnt/database/:
sysorb-createdb -d /mnt/database -f
The following will create a completely empty database (useful when adding new members to a ServerCluster):
sysorb-createdb -d /mnt/database -f -c
Chapter 12. SysOrb Import and Export tools
The SysOrb importing and exporting tools, called sysorb-importer and sysorb-exporter is provided to allow the user to import and export parts of the database. This could be either for importing in another system, or in order to create nodes/checks in SysOrb, from the commandline.
12.1. sysorb-exporter
The sysorb-exporter can be used to export a part of the SysOrb database to XML. Once the data is exported to XML, it can easily be manipulated and imported into SysOrb again, or it can be imported into other programs.
The syntax of the sysorb-exporter tool is:
sysorb-exporter [-h] [-s server] [-p port] [-d domain] -l login [-P password] [-f filename] [-e domain] [-i classes] [-I classes]
- -h
-
Displays a text on how to use the tool
- -s server
-
Instructs the utility which SysOrb server to connect to. Defaults to the local machine.
- -p port
-
If you SysOrb server uses a non-default port, use this switch.
- -d domain
-
Specifies the domain in which the user that is used for the login is placed.
- -l login
-
The login name of the user.
- -P password
-
The password for the login.
- -f filename
-
This option specifies the output file. If not specified standard out will be used.
- -e domain
-
The domain to export. I.e. if the users login is in the root domain, and the domain that should be exported is further in the tree, this option is useful.
- -i classes
-
Ignores the listed classes in the export. This is a comma-separated list, that allows to stop the export at a specific level, e.g. at the node level.
- -I classes
-
Include only the listed classes. This is a comma-separated list, that allows you to restrict the scope of the export operation. E.g. -I Domain,Node will cause only domains and the nodes to be exported, not any of the checks or other sub-objects of either nodes or domains. Appending a + to a class name will cause all sub-objects to be included, e.g. -I Domain,Node+ will cause all nodes with checks and other settings to be exported, while still excluding users and other objects present in domains.
12.2. sysorb-importer
The sysorb-importer can import XML-data exported from the sysorb-exporter, or XML-data generated by scripts or programs, as long as they use the same format as the sysorb-exporter.
The syntax of the tool is:
sysorb-importer [-h] [-s server] [-p port] [-d domain] -l login [-P password] [-f filename] [-m]
- -h
-
Displays a text on how to use the tool
- -s server
-
Instructs the utility which SysOrb server to connect to. Defaults to the local machine.
- -p port
-
If you SysOrb server uses a non-default port, use this switch.
- -d domain
-
Specifies the domain in which the user that is used for the login is placed.
- -l login
-
The login name of the user.
- -P password
-
The password for the login.
- -f filename
-
This option specifies the output file. If not specified standard out will be used.
- -i domain
-
The domain to import into. I.e. if the users login is in the root domain, and the domain that should be imported into is further down the tree, this option is useful.
- -m
-
When this option is specified, the sysorb-importer does not remove the outmost domain in the XML file, which is done otherwise.
12.3. Examples of how to use
In the following we will demonstrate how the importer and exporter can be used to automate the creation of nodes in SysOrb. These concepts can easily be expanded to allow automatic creation of other objects is SysOrb.
In this example we will assume that there exists a domain in the root-domain called Test, and in that domain a node called template is placed.
In order to export the contents of the Test domain, the command in the first line of the following example is used. The program will respond with something like the following lines.
Example 12-1. Exporting contents of the Test domain
$ sysorb-exporter -l admin -P admtest -e Test -i CheckGroup -f template.xml
Exporting database
Exporting domain Test.
Exporting statistical data (1.3266410235). Please wait.


Done
The -i CheckGroup is included in order to keep the exporter-tool from exporting the Checks configured on the node.
The above command will export a file called template.xml which will contain the following (note that there will be some differences between different exports):
Example 12-2. Contents of the exported file
<?xml version="1.0"?>
<Meta version="1.0" description="SysOrb exported database" timestamp="2004-04-13-T15:52:38">
</Meta><Object id="1.3266410236" type="Domain">
  <Property type="Enumeration(14)" name="downNotify" value="1"/>
  <Property type="String" name="label" value=""/>
  <Property type="String" name="name" value="Test"/>
  <Property type="Computed String" name="siblingName" value="Test"/>
  <Object id="1.3266410235" type="Node">
    <Property type="Boolean" name="acknowledgeAlerts" value="false"/>
    <Property type="Integer" name="alert" value="1000"/>
    <Property type="Integer" name="alertCeiling" value="1100"/>
    <Property type="Enumeration(12)" name="alertStrategy" value="1"/>
    <Property type="Unsigned Integer" name="checkinFrequency" value="30"/>
    <Property type="Integer" name="checkinScore" value="-5"/>
    <Property type="Enumeration(14)" name="downNotify" value="1"/>
    <Property type="String" name="label" value=""/>
    <Property type="Integer" name="missedCheckinScore" value="10"/>
    <Property type="String" name="name" value="template"/>
    <Property type="ObjectSet" name="nodeClasses" value=""/>
    <Property type="Computed String" name="siblingName" value="template"/>
    <Property type="String" name="snmpCommunity" value="public"/>
    <Property type="Enumeration(20)" name="snmpVersion" value="0"/>
    <Property type="Integer" name="warn" value="200"/>
    <Property type="Integer" name="warnCeiling" value="300"/>
  </Object>
</Object>
Before this file can be used to create new nodes in SysOrb, the name of the node must be changed. This is the property called name. Just change the value to something other than template. The following example shows the modified file, which can be used to create a node called New Node.
Example 12-3. Modified XML file, ready for import
<?xml version="1.0"?>
<Meta version="1.0" description="SysOrb exported database" timestamp="2004-04-13-T15:52:38">
</Meta><Object id="1.3266410236" type="Domain">
  <Property type="Enumeration(14)" name="downNotify" value="1"/>
  <Property type="String" name="label" value=""/>
  <Property type="String" name="name" value="Test"/>
  <Property type="Computed String" name="siblingName" value="Test"/>
  <Object id="1.3266410235" type="Node">
    <Property type="Boolean" name="acknowledgeAlerts" value="false"/>
    <Property type="Integer" name="alert" value="1000"/>
    <Property type="Integer" name="alertCeiling" value="1100"/>
    <Property type="Enumeration(12)" name="alertStrategy" value="1"/>
    <Property type="Unsigned Integer" name="checkinFrequency" value="30"/>
    <Property type="Integer" name="checkinScore" value="-5"/>
    <Property type="Enumeration(14)" name="downNotify" value="1"/>
    <Property type="String" name="label" value=""/>
    <Property type="Integer" name="missedCheckinScore" value="10"/>
    <Property type="String" name="name" value="New Node"/>
    <Property type="ObjectSet" name="nodeClasses" value=""/>
    <Property type="Computed String" name="siblingName" value="template"/>
    <Property type="String" name="snmpCommunity" value="public"/>
    <Property type="Enumeration(20)" name="snmpVersion" value="0"/>
    <Property type="Integer" name="warn" value="200"/>
    <Property type="Integer" name="warnCeiling" value="300"/>
  </Object>
</Object>
Using the modified file it is possible to create a node called New Node in any domain on the SysOrb Server. To create the node in the domain called New Domain (must be created before the command is executed), use the following command:
Example 12-4. Creating a node using sysorb-importer
$ sysorb-importer -l admin -P admtest -i "New Domain" -f template.xml
Importing database into domain 1.1004032985 and replacing it.
Importing configuration..                       Done
It is possible to expand on this to create domains, checks etc. from the command line. It is also possible to export the statistical data gathered by SysOrb if it must be processed by some other tool. However in this case sysorb-tool is a better solution, which is described in the next chapter.
Chapter 13. SysOrb Tool
The SysOrb Tool is provided in order to access the SysOrb database using a command line tool.
The syntax of the tool is:
sysorb-tool [-h] [-s server] [-p port] [-d domain] -l login [-P password] [-f filename] command [command-options] path | -i id
- -h
-
Displays a text on how to use the tool
- -s server
-
Instructs the utility which SysOrb server to connect to. Defaults to the local machine.
- -p port
-
If you SysOrb server uses a non-default port, use this switch.
- -d domain
-
Specifies the domain in which the user that is used for the login is placed.
- -l login
-
The login name of the user.
- -P password
-
The password for the login.
- -f file
-
This option specifies the input or output file. If not specified standard in or out will be used, according to the command used.
The command argument determines the output of the program. Currently there are seven different commands available:
- select
-
The select command is used for extracting statistical information about a check or the incident log from a node, and output it to a CSV file. It is possible to specify the time interval that should be exported. In this case the path argument is a path to a check.
- insert
-
The insert command allows the user to insert data into a check. The data is read from an CSV file, in the same format used by the select command.
- listdomains
-
listdomains is used to extract a list of domains. Which domains are listed are determined by the path, which must point to a domain. The command then lists all subdomains in this domains. This can also be done recursively, so the subdomains of the subdomains also are listed.
- listnodes
-
listnodes will list the nodes located under the domain, specified by the path.
- listchecks
-
listchecks will, if given a node as parameter, list all the checks on this node. If given a domain, all the checks on the nodes in the domain will be listed.
- listproperties
-
listproperties will list all the properties of the object identified by the path. This can be both Domains, Nodes and Checks.
- update
-
update will update the value of one or more properties in the object identified by the path.
The path is a string identifying either a domain, a node or a check. If the path identifies a domain, the path only consists of one item. This is a '.' seperated list of the domain names, leading to the domain. So a path to the 'Routers' domain located in the 'Backbone' domain would be 'Backbone.Routers'.
If the path identifies a node, it will consist of two parts seperated by a ','. The first path will identify the domain in which the node is located, in the same way as specifying a path to a domain. The second part is the node's name (not label) in SysOrb. I.e. a path to the node 'mainrouter' in teh 'Routers' subdomain would be 'Backbone.Routers,mainrouter'.
A third part is added when the path identifies a check. This part identifies the check for the SysOrb Server. However constructing thi part by hand is not easy, so the listchecks command should be used in order to obtain thie part of the path.
Instead of a path, the -i switch can be used. This switch allows you to give an ID to the domain/node/check instead of the path. The id's can be retrieved by the list commands.
13.1. The select command
select [-t timeformat | -u] [-b starttime] [-e endtime]
The select command allows you to extract statistical information about a specific check, or the incident log from a node, into a CSV (Comma Seperated Value) file.
- -t timeformat
-
Using this switch allows you to change the format of the time, when written to the CSV file. How to do this is documented in Section 13.1.1.
- -u
-
Using this switch will format the time as seconds passed since '1970-01-01 00:00:00 GMT'. Note that only one of the -u and -t switches can be used at a time.
- -b starttime
-
The earliest point in time, for which data should be extracted. This should be specified as either as the number of seconds passed since '1970-01-01 00:00:00 GMT', or as ISO time (YYYY-MM-DD-Thh:mm:ss). If -b is not given, the extraction will include the first data record, present in SysOrb.
- -e endtime
-
The latest point in time, for which data should be extracted. The format of endtime is the same as for starttime for the -b switch.
13.1.1. How to specify the timeformat
If you have specific requirements as to how the time stamps should be formatted, the -t option allows you to customize the output.
The timeformat is a string, in which some special character sequences will be replaced with specific parts of the date.
The following sequences are supported (note that the specific output of some of these sequences will depend on the language and region setting of the node where sysorb-tool is executed):
- %a
-
The abbreviated weekday name for the date.
- %A
-
The un-abbreviated weekday name.
- %b
-
The abbreviated month name for the date.
- %B
-
The full month name.
- %c
-
The preferred date and time format, according to the languange and region settings of the machine.
- %d
-
The day of the month. (01-31).
- %H
-
The hour on a 24-hour clock, as a number (00-23).
- %I
-
The hour on a 12-hour clock, as a number (01-12).
- %j
-
The day of the year as a number (001-366).
- %m
-
The month as a number (01-12).
- %M
-
The minute as a number (00-59).
- %p
-
AM/PM for 12-hour clocks.
- %S
-
The seconds as a number (00-61). The number of seconds can reach 61, in order to account for leap-seconds.
- %U
-
The week number of the year (00-53). This will start the numbering with the first sunday as the first day of week 01.
- %w
-
The weekday as a number (0-6). Sunday is 0.
- %W
-
The week number of the year (00-53). This will start the numbering with the first monday as the first day of week 01.
- %x
-
The preferred date format, according to the languange and region settings of the machine.
- %X
-
The preferred time format, according to the languange and region settings of the machine.
- %y
-
The year without the century as a number (00-99).
- %Y
-
The year with the century as a number
- %%
-
A '%' will be output.
13.2. The insert command
insert
The insert command reads a CSV file, and imports the data from that file, into a specific check in the SysOrb database.
The command takes no options, and it expects the timeformat of the CSV file to be either the default format outputted from select, or the format obtained when -u is used. The command will automatically determine which of the formats are used for the CSV file.
13.3. The listdomains command
listdomains [-o N | i | p | d ] [-r]
The listdomains command will list the sub-domains of the specified domain.
- -o N|i|p|d
-
This switch controls the produced output. Each of the letters will make the command output a different property of the domains being listed. The order of the letters etermins the order of the output. The letters have the following meanings:
- N
-
Will display the human readable name for the domain.
- i
-
Will display the ID of the domains.
- p or d
-
Will display the path to the domains, usable as a parameter for the listnodes or listdomains commands.
- -r
-
If this switch is given, not only direct subdomains will be listed, but also subdomains of the subdomains.
13.4. The listnodes command
listnodes [-o N | i | p | d | n ] [-r]
The listnodes command will list the nodes of the specified domain.
- -o N|i|p|d|n
-
This switch controls the produced output. Each of the letters will make the command output a different property of the nodes being listed. The order of the letters determine the order of the output. The letters have the following meanings:
- N
-
Will display the human readable name for the node.
- i
-
Will display the ID of the node.
- p
-
Will display the full path to the node, usable as a parameter for the listchecks command.
- d
-
Will display the path to the domain in which the node is located.
- n
-
Will display the path to the node, without the domain path.
- -r
-
If this switch is given, not only nodes placed directly in the selected domain will be listed, but also nodes in the subdomains.
13.5. The listchecks command
listchecks [-o N | i | p | d | n | c ] [-r]
The listchecks command will list the checks of the specified node or domain.
- -o N|i|p|d|n|c
-
This switch controls the produced output. Each of the letters will make the command output a different property of the checks being listed. The order of the letters etermins the order of the output. The letters have the following meanings:
- N
-
Will display the human readable name for the check.
- i
-
Will display the ID of the check.
- p
-
Will display the full path to the check, usable as a parameter for the select or insert commands.
- d
-
Will display the path to the domain in which the check is located.
- n
-
Will display the path to the node, on which the check is located.
- c
-
Will display the path to the check, without the domain and node path.
- -r
-
If this switch is given, not only checks placed on nodes which are directly in the selected domain will be listed, but also checks on nodes in the subdomains. This option has no effect if the path specifies a node instead of a domain.
13.6. The listproperties command
listproperties {path-specification} [-a] [-t] {property-name}...
The listproperties command will list some or all of the properties of a Domain, Node or Check together with the value of said properties..
- -a
-
When this switch is given, all properties of the given Domain, Node or Check will be listed, together with their value.
- -t
-
When this switch is given, the type of each property will be listed together with the propertys name and value
- property-name...
-
If the -a argument is not given, the listproperties will only list the properties where the name is explicitly given on the command line.
13.7. The update command
update {path-specification} {property-name=new-property-value}...
The update command will update one or more properties of a Domain, Node or Check, if necessary.
The commands arguments is a list of properties together with the new value of the property.
If you wish to alter the name of a domain, the parameter name="New Name" will change the name property of the specified domain to "New Name". When you use parameters that contains spaces, make sure that you quote according to the rules of your shell.
13.8. Understanding the CSV file-format
sysorb-tool has 3 different CSV formats, depending on which kind of check is selected.
The first line of each CSV file identifies the columns of the file. After this line, comes the real data from the check. Each line corresponds to one record in the SysOrb database. A record can contain several measurements. This is because SysOrb will "compress" older data, by combining several measurements into one record.
A measurement can be either good or bad. If it is good, it means that SysOrb actually have obtained a value from the check. If it is bad, it means that SysOrb was unable to obtain a value from the check. For example this is the case when SysOrb tries to perform a HTTP check, but cannot connect to the server.
13.8.1. Continuous checks
Continuous checks are the checks that are plotted as a line graph in the SysOrb Web-interface, plus the uptime graphs. E.g. all NetChecks are Continuous graphs.
A CSV file of a continuous check contains 7 different columns.
- Begin
-
The time at which the first measurement contained in the record is started.
- End
-
The end time of the last measurement contained in the record.
- Min
-
The minimum value of the good measurements.
- Avg
-
The average value of the good measurements included in the record.
- Max
-
The maximum value of the good measurements.
- ngood
-
The number of good measurements contained in the record.
- nbad
-
The number of bad measurements contained in the record.
13.8.2. State checks
State check are the checks that can be in different states. E.g. Process Presence check, RAID state check etc. are all State checks.
Internally in SysOrb the state of these checks are represented by a bit-mask. So when SysOrb "compresses" several state measurements into one, more bits get set in the bit-mask of the resulting record.
A state check CSV file contains 5 different fields:
- Begin
-
The time at which the first measurement contained in the record is started.
- End
-
The end time of the last measurement contained in the record.
- Mask
-
A bitmask where all the bits of the different states seen in the period of the record are seen.
- ngood
-
The number of good measurements contained in the record.
- nbad
-
The number of bad measurements contained in the record.
13.8.3. String checks
String checks are all the kind of checks that produce strings. Currently Log Checks and Incident logs for Nodes are the only kinds.
A CSV file of a string check contains the 4 different fields:
- Time
-
The time at which the string was encountered.
- Severity
-
An indicator of how severe the text message is. Currently three values are supported:
-
1 - Good
-
2 - Warning
-
4 - Alert
-
- Text
-
The text of the measurement.
13.9. Example scripts
In this section we will present two scripts which automate the extraction of all data in SysOrb (except Incident Logs) through the sysorb-tool.
One script is for bash, and should work with all Unix'es where bash is installed. The other script is for Windows.
Example 13-1. Example extracting all data using bash
#!/bin/bash

#
# Change these variables to match your setup.
#
SOTOOL="/usr/bin/sysorb-tool"
USERNAME=admin
PASSWORD=admtest
DOMAIN=.
SERVER=localhost

# This directory will be created by the script. If such a file or
# directory already exists, it will be deleted.
OUTPUTDIR=output

STDCMDLINE="${SOTOOL} -l ${USERNAME} -P ${PASSWORD} -s ${SERVER} -d ${DOMAIN}"


# Prepare the output directory.
if [ -e "$OUTPUTDIR" ]; then
    rm -rf "$OUTPUTDIR"
fi;

mkdir -p "$OUTPUTDIR"

# The outer loop extracts a list of all the nodes on the server.
$STDCMDLINE listnodes -r -o iN . | while read i; do

    # The id of the node is the characters before the first space
    NODEID=`echo $i | cut -d ' ' -f 1`

    # The name of the node is the rest of the characters. Remember to
    # translate /'es to _, as /'es are illegal in filenames.
    NODENAME=`echo $i | cut -d ' ' -f 2- | tr / _`

    echo "Exporting $NODENAME"

    # The inner loop extracts all the checks on one of the nodes
    $STDCMDLINE listchecks -o iN -i $NODEID | while read j; do

        # The check's id and the checks name, is extracted in the same
        # way as the nodes.
        CHECKID=`echo $j | cut -d ' ' -f 1`
        CHECKNAME=`echo $j | cut -d ' ' -f 2- | tr / _`

        # Extract all data for the check. If there is only need for a
        # period of data, the -b and -e options to the select command
        # can be used, together with the unix date command.
        $STDCMDLINE -f "$OUTPUTDIR/$NODENAME - $CHECKNAME".csv select -i $CHECKID
    done;
done;
Example 13-2. Example extracting all data on Windows
@ECHO off

REM The parameters to the sysorb-tool. The current one logs in as the user
REM admin with the password admtest in the domain . on the server localhost
SET params="-l admin -P admtest -d . -s localhost"

REM Change sotool to point to the path of the SysOrb tool.
SET sotool="%ProgramFiles%\SysOrb Server\sysorb-tool.exe"

REM Execute the sysorb-tool in order to extract the list of all the domains.
%sotool% %params% -f %tmp%\nodes.txt listnodes -r -o iN .

REM Now use the nodes.txt file as a parameter to the for loop

FOR /F "tokens=1*" %%i IN (%tmp%\nodes.txt) DO (
        REM echo Processing node %%j

        REM Extract a list of all checks present on the node
        %sotool% %params% -f %tmp%\%%i-checks.txt listchecks -o iN -i %%i

        REM If there are no checks on the node, the file will not be created.
        IF EXIST %tmp%\%%i-checks.txt (
                FOR /F "tokens=1*" %%k IN (%tmp%\%%i-checks.txt) DO (
                        ECHO Extracting data for %%l on %%j to file %%k.csv

                        REM Store the name of the check in the first line
                        REM of the CSV file.
                        ECHO Node,CheckName > %%k.csv
                        ECHO %%j,%%l >> %%k.csv

                        REM Extract the data for the check.
                        %sotool% %params% select -i %%k >> %%k.csv
                )
                DEL /F %tmp%\%%i-checks.txt
        )
)

rem DEL /F %tmp%\nodes.txt
Chapter 14. Acknowledgments
SysOrb uses parts from other software projects.
14.1. GD Graphics Library
Portions copyright 1994, 1995, 1996, 1997, 1998, 1999, 2000 by Cold Spring Harbor Laboratory. Funded under Grant P41-RR02188 by the National Institutes of Health.
Portions copyright 1996, 1997, 1998, 1999, 2000 by Boutell.Com, Inc.
Portions relating to GD2 format copyright 1999, 2000 Philip Warner.
Portions relating to PNG copyright 1999, 2000 Greg Roelofs.
Portions relating to libttf copyright 1999, 2000 John Ellson (ellson@lucent.com).
Portions relating to JPEG copyright 2000, Doug Becker and copyright (C) 1994-1998, Thomas G. Lane. This software is based in part on the work of the Independent JPEG Group.
Portions relating to WBMP copyright 2000 Maurice Szmurlo and Johan Van den Brande.
Permission has been granted to copy, distribute and modify gd in any context without fee, including a commercial application, provided that this notice is present in user-accessible supporting documentation.
This does not affect your ownership of the derived work itself, and the intent is to assure proper credit for the authors of gd, not to interfere with your productive use of gd. If you have questions, ask. "Derived works" includes all programs that utilize the library. Credit must be given in user-accessible documentation.
This software is provided "AS IS." The copyright holders disclaim all warranties, either express or implied, including but not limited to implied warranties of merchantability and fitness for a particular purpose, with respect to this code and accompanying documentation.
Although their code does not appear in gd 1.8.4, the authors wish to thank David Koblas, David Rowley, and Hutchison Avenue Software Corporation for their prior contributions.
14.2. OpenSSL Library
14.2.1. OpenSSL License
Copyright (c) 1998-2007 The OpenSSL Project. All rights reserved.
Redistribution and use in source and binary forms, with or without modification, are permitted provided that the following conditions are met:
-
Redistributions of source code must retain the above copyright notice, this list of conditions and the following disclaimer.
-
Redistributions in binary form must reproduce the above copyright notice, this list of conditions and the following disclaimer in the documentation and/or other materials provided with the distribution.
-
All advertising materials mentioning features or use of this software must display the following acknowledgment: "This product includes software developed by the OpenSSL Project for use in the OpenSSL Toolkit. (http://www.openssl.org/)"
-
The names "OpenSSL Toolkit" and "OpenSSL Project" must not be used to endorse or promote products derived from this software without prior written permission. For written permission, please contact openssl-core@openssl.org.
-
Products derived from this software may not be called "OpenSSL" nor may "OpenSSL" appear in their names without prior written permission of the OpenSSL Project.
-
Redistributions of any form whatsoever must retain the following acknowledgment:
"This product includes software developed by the OpenSSL Project for use in the OpenSSL Toolkit (http://www.openssl.org/)"
THIS SOFTWARE IS PROVIDED BY THE OpenSSL PROJECT ``AS IS'' AND ANY EXPRESSED OR IMPLIED WARRANTIES, INCLUDING, BUT NOT LIMITED TO, THE IMPLIED WARRANTIES OF MERCHANTABILITY AND FITNESS FOR A PARTICULAR PURPOSE ARE DISCLAIMED. IN NO EVENT SHALL THE OpenSSL PROJECT OR ITS CONTRIBUTORS BE LIABLE FOR ANY DIRECT, INDIRECT, INCIDENTAL, SPECIAL, EXEMPLARY, OR CONSEQUENTIAL DAMAGES (INCLUDING, BUT NOT LIMITED TO, PROCUREMENT OF SUBSTITUTE GOODS OR SERVICES; LOSS OF USE, DATA, OR PROFITS; OR BUSINESS INTERRUPTION) HOWEVER CAUSED AND ON ANY THEORY OF LIABILITY, WHETHER IN CONTRACT, STRICT LIABILITY, OR TORT (INCLUDING NEGLIGENCE OR OTHERWISE) ARISING IN ANY WAY OUT OF THE USE OF THIS SOFTWARE, EVEN IF ADVISED OF THE POSSIBILITY OF SUCH DAMAGE.
This product includes cryptographic software written by Eric Young (eay@cryptsoft.com). This product includes software written by Tim Hudson (tjh@cryptsoft.com).
14.2.2. Original SSLeay license
Copyright (C) 1995-1998 Eric Young (eay@cryptsoft.com) All rights reserved.
This package is an SSL implementation written by Eric Young (eay@cryptsoft.com). The implementation was written so as to conform with Netscapes SSL.
This library is free for commercial and non-commercial use as long as the following conditions are aheared to. The following conditions apply to all code found in this distribution, be it the RC4, RSA, lhash, DES, etc., code; not just the SSL code. The SSL documentation included with this distribution is covered by the same copyright terms except that the holder is Tim Hudson (tjh@cryptsoft.com).
Copyright remains Eric Young's, and as such any Copyright notices in the code are not to be removed. If this package is used in a product, Eric Young should be given attribution as the author of the parts of the library used. This can be in the form of a textual message at program startup or in documentation (online or textual) provided with the package.
Redistribution and use in source and binary forms, with or without modification, are permitted provided that the following conditions are met:
-
Redistributions of source code must retain the copyright notice, this list of conditions and the following disclaimer.
-
Redistributions in binary form must reproduce the above copyright notice, this list of conditions and the following disclaimer in the documentation and/or other materials provided with the distribution.
-
All advertising materials mentioning features or use of this software must display the following acknowledgement:
"This product includes cryptographic software written by Eric Young (eay@cryptsoft.com)"
The word 'cryptographic' can be left out if the rouines from the library being used are not cryptographic related :-).
-
If you include any Windows specific code (or a derivative thereof) from the apps directory (application code) you must include an acknowledgement: "This product includes software written by Tim Hudson (tjh@cryptsoft.com)"
THIS SOFTWARE IS PROVIDED BY ERIC YOUNG ``AS IS'' AND ANY EXPRESS OR IMPLIED WARRANTIES, INCLUDING, BUT NOT LIMITED TO, THE IMPLIED WARRANTIES OF MERCHANTABILITY AND FITNESS FOR A PARTICULAR PURPOSE ARE DISCLAIMED. IN NO EVENT SHALL THE AUTHOR OR CONTRIBUTORS BE LIABLE FOR ANY DIRECT, INDIRECT, INCIDENTAL, SPECIAL, EXEMPLARY, OR CONSEQUENTIAL DAMAGES (INCLUDING, BUT NOT LIMITED TO, PROCUREMENT OF SUBSTITUTE GOODS OR SERVICES; LOSS OF USE, DATA, OR PROFITS; OR BUSINESS INTERRUPTION) HOWEVER CAUSED AND ON ANY THEORY OF LIABILITY, WHETHER IN CONTRACT, STRICT LIABILITY, OR TORT (INCLUDING NEGLIGENCE OR OTHERWISE) ARISING IN ANY WAY OUT OF THE USE OF THIS SOFTWARE, EVEN IF ADVISED OF THE POSSIBILITY OF SUCH DAMAGE.
The licence and distribution terms for any publically available version or derivative of this code cannot be changed. i.e. this code cannot simply be copied and put under another distribution licence [including the GNU Public Licence.]